
As a result of using current, real-world STARs (Standard Terminal Arrival Routes) in my FS flying, I’ve become aware that many of the defined Intersections and GPS Waypoints that exist in today’s real-world airspace are absent in FS. It’s a dynamic world we live in with STARs, DPs and IAPs being added or revised frequently. With some help from others, not least Mutley who gave me the boot down the first few steps of the right path, I’ve figured out how to add them as needed. It’s a relatively simple process. Trust me, you can do this.
Correcting this very minor issue in Flight Simulator is not going to interest many/most FS users. As deficiencies go, this one is pretty minor. If you’re in the habit of using the real-world navigation pubs as source material for your flight planning and flying this process might solve a problem for you. If that’s not the kind of flying you do, the chances are that you’ve never known or cared about this one, tiny little facet of FS being out of synch with the real world. Take it for what it’s worth to you in your own FS situation. If you’ve noted the problem and would like to fix it, this does. Otherwise what’s here won’t do much for you, except possibly give you an opportunity to gain a little insight into how some FS things work. Read on, or not - as you wish.
I’m going to use that dreaded term now – brace yourself… XML! OK, good – we’ve got the initial shock behind us. Take a deep breath and try not to hyperventilate - please stay with me. It’s not so bad as you may think. In fact, it’s dead easy.
The process for adding a waypoint (or many) to FS is quite simple. The important steps are…
• Create an XML file (just plain old text) that contains the needed waypoint data in the prescribed format.
• Compile the file into a BGL file.
• Move the BGL file into an FS scenery folder.
You don’t need much to do it… Notepad and the appropriate version of the Flight Simulator Software Development Kit (SDK), either FS9 or FSX, are the essential pieces. If you have FSX Deluxe, you already have the SDK for that particular version of the sim, though you may have chosen not to install it. It’s on the disk set. Both SDKs are available free over the Internet here…
FSX: http://msdn.microsoft.com/en-us/esp/cc743171.aspx
I use the terms waypoint, intersection and fix indiscriminately in this article. For our purposes here they all mean the same thing and FS treats them the same. You don’t need to do anything any differently whether you are entering an Intersection or a GPS Waypoint or an ad hoc fix of your own (yes, you can do that). It’s all the same.
Let’s work our way through the process step by simple step…
Step 1 – Create the XML Source File:
XML files are just text files with an XML extension. They can be created and edited very satisfactorily with Notepad. The XML file format is prescriptive, but not difficult. You can do all you need to for this particular operation by simply copying and pasting the example text below into Notepad. Following that you’ll only need to edit the data values for the waypoint(s) you are entering. I’ll show examples of how to add a single waypoint or several at one time.
To make your XML file, open Notepad and copy in this text (don’t include the dashed lines):
- - - - - Example XML File For Adding A Single Waypoint - - - - -
The example text above is the entire XML file that is required to add a single waypoint, LEBUR, off the east coast of Florida, in this case.
When you save your XML source file after entering the waypoint data you may give it any name you wish, but you should be sure to give it the XML extension. Do not accept the default TXT extension that Notepad normally supplies.
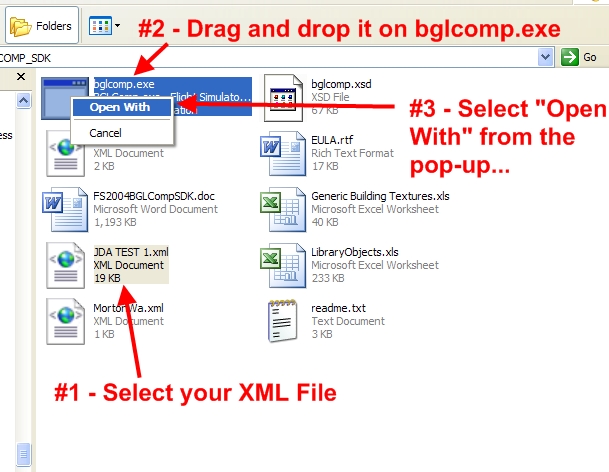
Once it’s been named and saved with the XML filename extension, re-opening your source code XML file should you wish to edit it subsequently will require using the “Open With” command from the right-click menu of your file folder. If you simply use “Open” it will come up in a browser window with all sorts of “helpful” labels that will just add an unnecessary layer of confusion. Stick with Notepad and the “Open With” command thusly...

• Latitude
• Longitude
• Waypoint Type
• Magnetic Variation
• Waypoint Region
• Waypoint Name
I recommend that you gather the necessary waypoint data and have it available before beginning to work with the XML file. Having done that you can just plug in the values and save the XML source file. Each value must be enclosed in double quote marks just as shown in the example code above.
Latitude and Longitude are self-explanatory. These values should be in decimal format, i.e. degrees and a decimal fraction of a degree. The compiler may or may not accept other formats, but I’m sure this one works. Examples I’ve seen use eight decimal places and FS seems happy with that when I compile and use them. That level of precision is approximately equal to a hundredth of a second – a matter of a few feet of longitude at the equator. That should be close enough for the most anal of Air Traffic Controllers. For a quick refresher on converting from Degree-Minute-Second format to decimal degrees see Appendix 1 at the end of the article.
Bear in mind when entering these values that latitude north of the equator is positive; south latitudes are entered as negative values. Going east from the prime meridian to 180 degrees are positive longitude values and going west they are negative. To give an example in each of the possible four quadrants, Moscow’s L & L are both positive; New York’s requires positive latitude and negative longitude; Rio de Janeiro has negative values for both latitude and longitude; Sydney gets a negative latitude and positive longitude.
Waypoint Type must be one of several prescribed values for this field that are acceptable to the SDK BGL Compiler. For our purposes always use the value “NAMED” in that field. The other types and their uses are beyond the scope of this article.
Magnetic Variation is the difference between true north and magnetic north at the location of the waypoint. East variation is negative, west is positive. It’s not particularly important that this be dead-accurate. The published data for a nearby real-world airport or navaid is a good source. Enter this as a whole number with one decimal place. Usually the decimal value is zero. If you have more accurate data, use the first decimal digit as well but don’t break into a sweat if you only have an integer value – it’s OK.
Waypoint Regions are strictly FS concoctions; they do not really correspond to any real-world entities, though they do have an obtuse connection to ICAO codes. They are used by FS in ways that are not well-understood, at least by me. The value is normally the first two letters of the ICAO airport codes for the country in which the fix lies. For example, a fix in England would have a waypoint region value of “EG”. There are exceptions, however. For example, the US is divided into seven waypoint regions in FS, named K1 through K7. The best and easiest source I have found for this value is to use the newly-released freeware airport editor ADE9X. The data displayed for airport properties includes the waypoint region for the airport. Open an airport near your waypoint location and use that code. This field must contain exactly 2 characters.
[Editor's Note: The region field also displays in the FS Garmin GPS in the Waypoint pages. If you look up a nearby VOR, NDB or Intersection (but not an airport) in the GPS you will find the correct region code displayed there. It only appears in the WPT pages, not in the NRST pages.]
Waypoint Name is just that. If the waypoint you are entering is a RW intersection or GPS Waypoint, by all means use that exact published name. Normally these are all-caps values. If you’re entering your own made-up fixes use any name you wish. This field has a 5-character limit.
I’ve discovered that duplicate waypoint names may exist, i.e. the same fix name at two (usually widely separated) locations. That doesn’t seem to cause any difficulties.
Now let’s quickly touch on entering more than one fix with a single XML file. See the example code below. Adding more fixes to the file is just a matter of replicating the Waypoint block which lies between the two Waypoint tag lines. The Waypoint tags before and after the data are part of the block and must be replicated too.

IMPORTANT: The
Yes, it’s as simple as that. You may just continue to add more Waypoint constructs to the file as shown. What is the benefit of multiples in the same file? Each XML file spawns a bgl file of the same name when compiled. You can keep all your added waypoints in the same XML file and only have one bgl file to add to FS. If you come back later to add more, append them to the XML file you used previously, compile it again and overwrite the old bgl with the new one.
Step 2 - Compile the XML File:
Copy your XML file to the folder where your SDK BGL Compiler (bglcomp.exe) resides. Remember that you must use the BGL Compiler that is part of the SDK for your particular version of FS. A bgl created by the FS9 compiler will not work in FSX nor vice versa. In my case the FS9 compiler is at…
C:\ -> Program Files -> FS2004SDK -> BGLCOMP_SDK
Creating the bgl file is simplicity itself. Select your XML file, drag and drop it on top of the icon for bglcomp.exe and select Open With from the menu that pops up.

The final step is the easiest. You simply move the newly created bgl file into the appropriate folder in FS. The best place for it, assuming FS9 and a standard installation is…
C:\ -> Program Files -> Microsoft Games -> Flight Simulator 9 -> Addon Scenery -> Scenery
After placing the new bgl there, you must re-start Flight Sim. [Editor’s Note: For FSX you do not have to re-start FS after moving a bgl in. If you move the file into an existing area such as Addon Scenery the user only needs to open the scenery manager then close it; scenery addition is dynamic when the scenery manager screen is closed, accomplishing the same thing as a re-start.] You should see the startup message that indicates that FS is re-compiling the scenery databases – this indicates it’s found something new and all is well.
Once FS starts, open the Flight Planner. Be sure Intersections are turned on in the Edit view (the triangular icon in the button bar should be green). At the appropriate zoom level and in the correct neighbourhood you should find your new waypoint(s). A label will appear to identify waypoints as you mouse over them. If several are in close proximity, left click and a pop-up menu will show you what lies at that location.

Here’s a flight plan that includes both of our newly added intersections.
Add-On Flight Planners
If you use a third party flight planner it may or may not be capable of reading the newly created fix data directly from FS. Running an import routine may be necessary to update the flight planner or something a little more complicated may be needed.
In my case I use FS Navigator. Though it has a scenery import utility that collects airport and navaid data directly from FS, FSN specifically does not read intersection and waypoint fix data from sim database. Instead it uses a text file of fixes (ISEC.TXT) which must be manually edited to add the new waypoints. ISEC.TXT is then processed through FSN’s own compiler to add the new waypoints. Fortunately the text file format is simple and the values can be readily copied and pasted in from the XML source file that was used to add the fixes to FS. Once the text file is edited and re-compiled the new fixes appear in FSN and can be pulled into flight plans created with it.
Please e-mail questions, comments or errors to allardjd [at] earthlink [dot] net or post in the forums.
Given one of our new waypoints in D-M-S format, exactly as I found it on the Web…
Name: LEBUR
Location: 27-37-50.020N 079-57-19.690W
…let’s go through the process for making these coordinates into equivalent decimal degree values.
For each coordinate it’s a four-step process:
• Convert the seconds term to a decimal fraction of a minute
• Add the converted seconds value to the whole-number minutes term
• Convert the resultant to a decimal fraction of a degree
• Add the converted minutes value to the whole-number degrees term
Start with the Latitude value of 27-37-50.020N and convert the seconds term, 50.020, to minutes by dividing by 60…

© John Allard