Introduction
In their tireless pursuit of the elusive “as real as it gets”
ideal, flight simmers have long sought to emulate their real
world counterparts. This desire has led to the introduction of
real world weather injection into the sim, increasingly detailed
and accurate scenery and airports, aircraft which are so
realistic that one of them (the PMDG 777) is a Boeing officially
licensed product, hardware which (for the well-to-do, at least)
can be a close approximation to the flight deck, and so on.
Nonetheless, before the more serious simmer can undertake a
flight using any of those goodies, (s)he does have to give some
thought to where they are flying to, and how to get there.
So it is that route databases and flight planners of varying
degrees of complexity and real world authenticity came into
being and have been around for some time. Many of these are
hosted online (such as the Real World Flightplan Database,
RouteFinder, and so on) whilst others are installed on the
desktop (FlightSim Commander, FSBuild, et al.), but the intent
of all of them is to enable simmers to construct a flight plan
which will take them from their origin to their destination with
as much fidelity to real world practice, and real world
conditions, as possible.
PFPX
Professional Flight Planner X, to give PFPX its full title, was
finally released towards the end of August 2013, following a
gestation period of (it has to be said) considerable length.
Furthermore, since its first release it has rapidly undergone
numerous revisions, not to mention hot fixes; so that it is only
now — getting on for three months later — that it seems fair to
consider the product to be sufficiently mature for a Mutley’s
Hangar review. (There remains a suspicion that although its
release was within a couple of weeks of the release of the PMDG
777, this was in fact slightly before PFPX itself was fully
ready). So this review is therefore based on version 1.11 of the
product.
It has to be said at the outset that, whilst it is no doubt
possible to use PFPX for VFR flying, it appears to be primarily
targeted at those simulated aircraft that have Flight Management
Computers which approach the complexity of the real thing.
Unlike any planning tool that has been available to simmers
before, it fully supports ETOPS (Extended range Twin OPerationS),
and so it especially suitable for flight planning with aircraft
such as the PMDG (twin-engined) long-range 777. Many other
long-range aircraft are available, of course, including
Aerosoft’s Airbus X and PMDG’s venerable — and soon to be
replaced by version 2 — 747X. (Although, bearing in mind PMDG’s
habitual gnomic utterances on the subject of timescales, it
would be safer to say soon-ish). It is also true that PFPX
certainly has a role in flight planning for serious turboprops
such as the Majestic Dash-8 Q400. So this review will assume
that the reader is at least potentially interested in long range
operations.
Since it has to calculate the fuel requirements, PFPX supports
only very specific combinations of aircraft and engines “out of
the box” (and you will then need to use the Aircraft Editor to
add your own tail number, the first time you use it). The list
at the time of writing follows, but for the current list of
supported aircraft and engine types, please visit
http://www.flightsimsoft.com/downloads/
![]() — and in the PFPX section click “More downloads”: there you will
see the current “Aircraft type and add-on export list” which you
can download. Whilst you’re there, you might like to download
the “Flight plan template guide” (revision 7, at the time of
writing) which enables you to customise the output format of the
finished flight plan to suit your tastes, your particular VA, or
whatever you wish. A copy of the PFPX manual is available, too, if
you would like to read it before you buy.
— and in the PFPX section click “More downloads”: there you will
see the current “Aircraft type and add-on export list” which you
can download. Whilst you’re there, you might like to download
the “Flight plan template guide” (revision 7, at the time of
writing) which enables you to customise the output format of the
finished flight plan to suit your tastes, your particular VA, or
whatever you wish. A copy of the PFPX manual is available, too, if
you would like to read it before you buy.
 |
But the program’s enormous amount of functionality is inevitably accompanied by a certain complexity, so that there is bound to be a definite learning curve when you acquire this program (since to use it to the fullest extent you will need to learn some of the skills of a dispatcher).
In this review I will be giving you a very brief guide to planning a transatlantic flight using the program, since that is probably the best way to illustrate its many features. However, I must ask you to be aware that here and there you may encounter ideas or acronyms with which you are not immediately familiar — although I will aim to explain the most relevant ones as we proceed — and also that I cannot hope to cover every aspect of the program (PFPX has a lot of functionality). I will assume, too, (and I think this is a fair assumption) that anyone reading this will have at least some familiarity with the basics of flight planning, so that I don’t have to begin right at the beginning.
Here we go then, and let's start with the published list of the product's features:
● Fully adjustable and customizable user
interface
● Worldwide navigation database (regular updates available from
third-party providers*).
● "Easy plan" function for quick flight plan creation
● Large database of included aircraft types
● Re-Dispatch and EROPS/ETOPS integration
● Cost-Index based flight planning and constant Mach number
segments
● Various integrated fuel planning rules (EU-OPS, FAR, CASA,
etc.)
● User-definable individual fuel planning rules
● Real-time METAR/TAF and NOTAM download
● Accurate up-to-date Upper winds
● Graphical, zoom- and pan-able world map
● Printable flight briefing package
● Plan via North Atlantic Tracks (NAT), Pacific Track System
(PACOTS) and Australian Organized Track System (AUSOTS)
● Automatic, manual or advanced route building including
SIDs/STARs
● Route export function to various add-ons
● CFMU flight plan validation
* The database version that comes with the program is AIRAC 1302
 |
Reading through that list may give you a preliminary
indication of the program’s range and scope.... Buying PFPX (and perhaps TOPCAT) The prices that I quoted above for PFPX cover the program itself and some initial database information. Here is a link to the Aerosoft purchase page (please bear in mind that whilst the following link, and all links given in this review, are valid at the time of writing, things can change on the Internet, as we know — as, indeed, can the prices): Link (Near the bottom of that page you can find links from whence you can download the program’s manual, and also an example “flight briefing package”). |
However, since the program can, to some extent, send data to TOPCAT (a utility by the same author to calculate take-off performance, notably the applicable derate), you can buy both programs for a bundle price of €55.45 (plus any applicable VAT) — but only from Flightsimsoft, since Aerosoft do not sell TOPCAT. (I will say something about the integration with TOPCAT later in this review). Here is the link containing the various Flightsimsoft prices for both programs, and also the bundled price: Link
The ancillary databases
PFPX requires two sets of external data. The first set comprises the usual navdata relating to airways, navaids, approaches and departures, and airports. When you download PFPX it is supplied with navdata relating to AIRAC 1302 (i.e. the second of the four-weekly cycle of updates released in 2013), but if you wish to update that to a different version you can do so by buying a more recent AIRAC version from Aerosoft or Navigraph. Here are the relevant links, once again in alphabetical order, so Aerosoft first: Link
Aerosoft’s NavDataPro is available as a single navdata cycle, or for four cycles in a year, or for all 13 cycles, at correspondingly (but not linearly so) increasing prices. The Navigraph data is available in the same three bundles, and you can find the Navigraph prices here: Link
There are many links on the Internet purporting to compare the quality of the navigation data from these two providers, so your search engine will assist you if that is your aim. But regardless of whichever provider’s data you might choose I would strongly urge you to ensure that you update all your aircraft and utilities to the same AIRAC number, so that you have no conflicts when, for example, planning your flight in PFPX and then importing it into your Boeing 747-400 and subsequently tracking it in Aivlasoft EFB.
But I did say that PFPX relies upon two sets of ancillary data; and whilst it is clear that the program will need navdata information about airfields, airways, SIDs, and so on, the need for the second set might not be immediately obvious. So permit me to quote from the Aerosoft site:
“PFPX uses several types of data to provide real-time information directly into the program. These data are collected from various sources, processed and formatted by our servers and automatically distributed to your local PFPX device. These data are: Winds, METAR, TAF, Tracks and NOTAMs”.
The site then adds:
“Providing this up-to-date real-time data produces quite a large amount of server data traffic.”
Presumably, that last sentence is intended as a justification for the fact that this second set of data, which is available only from Flightsimsoft, requires an annual subscription — currently €12.42 for one year (although your first year’s subscription is included with the program, so that you have 365 days from whenever you activate PFPX before the first subscription becomes due). They further seek to justify it as follows:
“If you elect NOT to extend the server subscription, PFPX will still be fully functional, but without real-time data such as Winds, METAR, TAF, Tracks and NOTAMs. Other sources, like ActiveSky and Real Environment Extreme and your saved weather data and tracks will still be functional! You can elect to extend your subscription at any time, even if it already has expired!”
Hmm….. “Fully functional” without current oceanic tracks data? Anyway, whilst it is entirely understandable that PFPX will need data about winds, METARs, TAFs, and oceanic tracks (quite frankly, I’m less sure about the NOTAMs, since I don’t usually find them to be of much relevance within the simming environment) many simmers have questioned why this data should be chargeable as an extra, following the first year of use. After all, when you buy a weather program you are not then charged an additional annual subscription to download the weather data, so why the additional cost in the case of PFPX? (I’m not about to enter into that debate, I’m simply mentioning its existence). But there again, it does seem to me that a fraction over one Euro a month is perhaps not an enormous sum to pay — depending, of course, on how often you plan a route, and in what depth.
You will have observed that included in the “server subscription” (as it is termed) is data relating to oceanic tracks. We know, of course, that these tracks are updated on a daily basis, and PFPX does accurately reflect that fact. Regardless of whether it will utilise NATs (North Atlantic Tracks), PACOTS (Pacific Organized Track System), or AUSOTS (Australian Organised Track Structure), if you are contemplating a long range flight in those regions PFPX now makes it deliciously simple to incorporate the correct tracks for the day into your flight plan. This is a huge leap forward in flight planning for simmers.
There’s a possible issue here, of course: after downloading, installing, and activating PFPX, an Internet connection is also required for accessing real-time wind data, METAR, TAF and NOTAMs. But again: if you are already downloading your weather over the Internet at regular intervals, not to mention perhaps being online for an ACARS system for your VA’s PIREP submission, chatting to your friends via TeamSpeak, and so on, you probably have an “always on” Internet connection anyway, so this is unlikely to be a problem for you.
Learning PFPX
There can be no doubt that planning a flight to the full extent of which PFPX is capable will represent a challenge for most simmers, the first few times they use the program. This challenge derives from the complexity of PFPX itself, and also from the dispatch-oriented terminology used (EU-OPS, CFMU, re-dispatch, AUSOTS, and all the rest), not to mention the fact that being a real world flight dispatcher is a specialised technical job. Happily, however, there are a number of sources from whence help can be obtained.
The most obvious place is, of course, the PFPX manual (which is downloadable prior to buying the program, from the links given above). The official manual comprises some 87 A5 pages, and certainly gives an overview of the program. However, it suffers from the usual problem which is common to many such manuals: whilst it describes the program interface, and even spends a fairly terse 15 pages discussing the flight planning process, it doesn’t really tell you why and when you would need the various program options, nor does it give more than a bare overview of the dispatcher’s role. Most tellingly of all, it suffers heavily from a lack of examples: I would ideally have wished for a much longer manual that gave a suitably comprehensive introduction to the use of PFPX for flight planning.
So I had to look elsewhere to supplement my flight planning knowledge.
I first of all found the PFPX videos. There are six of them (one in German), and the links can all be found on this page: Link
Here is a very quick sketch of what each one covers:
First steps: Link
This covers program installation and activation; basic program settings and options; then a brief run-through of the flight planning process, and printing the result. (I think the German video “PFPX Erste Schritte zum Release” is probably another version of this, although owing to my shameful lack of German I can’t be sure).
Overview 01 (no sound): Link
Adding a flight, using the Advanced route finder options.
Overview 02 (I turned the sound off — you’ll see why….): Link
Another planning example — from EGPH to KIAD. This covers re-dispatch with ETOPS 120, using BIKF Keflavik and CYQX Gander (showing the "circles"). It finally demonstrates sending the route to TOPCAT (v2.72 beta).
Overview of the paperwork: Link
The route takes you from Brize Norton EGVN to Bangor KBGR. This covers the ETOPS DATA and FPL message sections in a 120 minute ETOPS flight using EINN/SNN, BIKF/KEF, and CYYR/YYR.
Re-dispatch overview: Link
From Guatamala MGGT to Los Angeles KLAX (Guatamala is high elevation, with a short runway and high mountains to the north). The primary purchase of re-dispatch is to reduce the en route fuel reserves, as the video explains.
 |
Then there is the two-part tutorial. My prayers — and, I have no
doubt, those of many others — were finally answered by the
provision of a really excellent two-part tutorial (in pdf
format), which goes a long way towards remedying the
deficiencies of the official manual. Entitled “ETOPS and Oceanic Procedures” and written by Belisar Hoxholli, part 1 covers the activities in the dispatcher’s office, whilst part 2 covers what happens on the flight deck subsequently. Quite frankly, I learned more from reading very carefully through this two-part tutorial than from the sum total of the videos and the official manual: Mr. Hoxholli has done the flight sim community a huge service. The links are to be found pinned on the PFPX forum page here: Link |
And for the sake of completeness, here are the links for each part individually:
Part 1: Link
Part 2: Link
I would seriously recommend anyone wishing to get the best out of PFPX to look at all the above sources, but especially both parts of the “ETOPS and Oceanic Procedures” tutorial. Of course there are other PFPX tutorial videos on the Internet which can be easily found, but as usual these are of varying quality, so please exercise due caution. But if you like a laid back presentation, for example, you may find these PFPX videos by Kyle Rodgers helpful:—
Tutorial 1: Link
Tutorial 2: Link
Once you understand the fundamentals, Kyle also has a video about delay information, here: Link
Between them, the above collection should equip you well to use PFPX.
The PFPX workspace
I mentioned above that PFPX is huge, and indeed the program has so many aspects to it that initially there is a tendency to feel overwhelmed. Although its multiple functions are logically laid out once you know when to use them, when you start to use it for the first time it can be difficult to comprehend what has to be done and in what order. However, the program has some excellent built-in assistance, as we will see in a moment.
Upon starting the program you see a splash screen whilst the program loads its data. The program then displays its opening screen, which comprises some header material, top left, with the rest of the page divided into scheduled flights on the left and the world map on the right. Here is the top left information in close-up:
 |
||
| Clicking on the grey globe gives you a dropdown with access to
the data manipulation and editing facilities, although the small
symbols on the top line to the right of the globe give you the
same access without using the dropdown. As you can see, this area of the program is where you can add your own aircraft, configure weather sources, and generally do all the housekeeping tasks associated with defining and editing the data upon which the program relies. This also gives access to the main program options, where you define what weight units you wish to use and the source for your weather information (i.e. PFPX or your existing weather program). On the General tab you can see which version of the program you are using, and get it to automatically check for updates each time it is opened. |
 |
|
 |
Easily overlooked, since it's on the far right of the top line
away from the rest, is the Style dropdown which has options for
the program “skin” colour, as well as a useful facility to reset
the position of the windows if you have dragged them into a
tangled configuration. The Help dropdown alongside it gives access to the manual and the PFPX forum, as well as the ability to directly open a support ticket. Immediately below the quick access toolbar are four tabs: Schedule, Flight, Traffic, and Browser. Selecting any of these will cause the main panel below to change accordingly. So the close-up above showed its configuration when Schedule is selected, but selecting Flight changes it to this:— |
|
 |
||
Beneath the main panel you will notice an area referred to as the “message and action bar”. This, as you discover once you start to use the program in earnest, helpfully suggests to you your probable next course of action (ringed, in the above screenshot), and whilst you are learning the program this is an enormous help! Often in the early days I found myself wondering what was the logical next step, and a glance at this area usually provided the answer. (It’s the sheer size of PFPX which is the challenge whilst you are getting to grips with it, closely followed by the many unfamiliar acronyms and flight planning concepts — and it’s easy to feel confused at first).
For a reviewer, the challenge with a product of this complexity is to steer a middle course between providing so much detailed information that there’s a danger of writing a full scale tutorial on the one hand, or on the other simplifying things too much — with the result that only a subset of the program’s features will be covered. So I will try to provide an outline of those aspects of the program which you will hopefully find most helpful, whilst giving you a brisk walkthrough of the essential actions which are required during the planning process. At the same time I will also try to acquaint you with the concepts underlying ETOPS (which are central to the program’s operation) and explain a few of the most important acronyms.
Terminology and acronyms — introducing ETOPS
Probably the first area of difficulty for the PFPX beginner is the terminology and those acronyms. For example, “OFP” didn’t mean much to me the first time I saw it, until I realised that it was an acronym for “Operational Flight Plan” (or just “flight plan”, for short). But that was only the start of it. So I will try to introduce you to a few of the most important ones gently, as we go along.
One concept which it is essential to understand from the outset, however, is ETOPS itself. Having already mentioned that this refers to Extended range Twin OPerationS, I will now try and give you a succinct overview of what it’s about, since you will need an understanding of ETOPS before undertaking long range planning.
When twin-engined aircraft started to fly long range trips there was clearly concern about what would happen in the event of engine failure, since, unlike a four-engined machine, in the case of a twin only one engine remains operational, which could potentially constitute a problem if the aircraft was in the middle of a large ocean when the problem occurred with hours of flying time to the nearest airport. So here is a diagram borrowed from the start of Mr. Hoxholli’s tutorial which illustrates the essential concepts:
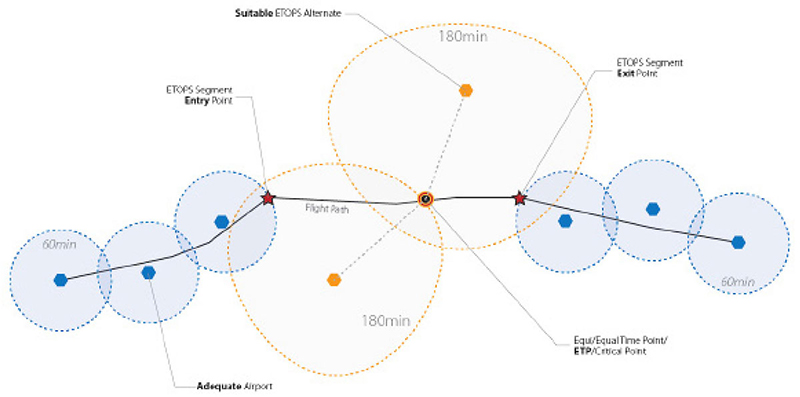 |
At the beginning and the end of the route shown, we are never more than 60 minutes’ flying time from one of the Adequate Airports (definition coming up, very soon), as indicated by the blue circles. If our whole route is like that then ETOPS doesn’t enter into it. But in this case we can see that there’s a big chunk in the middle — crossing the Atlantic, perhaps — where such is not the case, and so we have to plan this flight using ETOPS. Depending on what rating our aircraft is certified to, and in the diagram above it’s clearly ETOPS 180, during the ETOPS portion of the flight we need to be within 180 minutes' flying time (in this case) of an ETOPS Alternate airport. The orange “circles” on the diagram show this — they are usually distorted when you view them owing to the map projection involved.
At this point I have to break off for a moment and also explain what constitutes an Adequate Airport. (There are many documents which you can find on the Internet that relate to this discussion, but you will discover that they are often written in aviation legalese, often with cross-references to each other’s arcane names, e.g. “those sections of 14 CFR 121 applicable to ETOPS” — a practice which is hardly helpful to those of us who are not dispatchers. So my definitions here are necessarily simplified).
In fact, though, the term “Adequate Airport” probably means more or less what you might expect. Stripped of the legalese, it boils down to being an airport that can handle the aircraft in question (so please notice that it is aircraft-specific), which means that the airport must have adequate navigational aids, a long enough runway, ATC, stairs high enough to allow the passengers to disembark, at least one runway with an instrument approach, and so on.
If the weather at an Adequate Airport is above the specified minima, and local conditions allow a safe landing to take place, then that is also a Suitable Airport. (You can see how legalese is bound to creep in, once you start to go down this road….).
OK, back to ETOPS and our aircraft: let’s get specific and make it a 777, for argument’s sake, and further stipulate that it is contemplating a flight between London Gatwick EGKK and Orlando Florida KMCO over the North Atlantic, which obviously means using one of the North Atlantic Tracks of the day. Since there is definitely at least one point along the selected route which is more than 60 minutes’ flying time away from an Adequate Airport (at the approved one-engine-inoperative cruise speed), then we need to plan it as an ETOPS flight.
Notice also that the definition is firmly in terms of flying time, not distance. For a 777, 60 minutes’ flying time often equates to 420 nm, so you will see that, rather like the diagram above, our example flight will have a fairly long ETOPS segment in it. Happily for us, PFPX is extremely good at giving us a pictorial representation of what is going on, to assist our planning efforts.
ETOPS example — including some more definitions
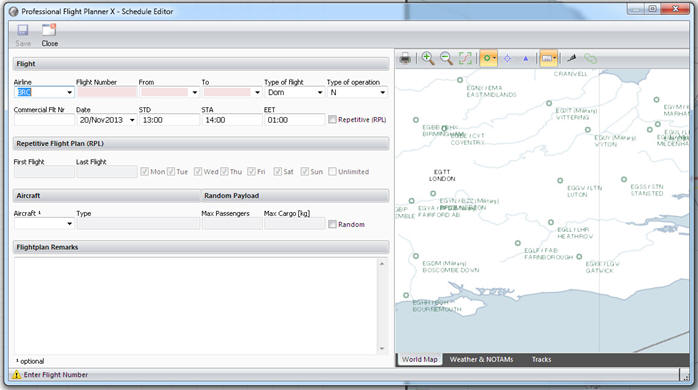
On starting PFPX I click the Add button (at the top left of the top left information which I illustrated above). In passing, may I mention that like other buttons on the PFPX screen, this one is in two parts: clicking the lower part opens a dropdown giving us a choice of adding a return flight to the one already selected, and importing or exporting a schedule — but I clicked the top of the button, allowing me to simply add a new flight to my schedule.
 |
||
| The airline shown is a fictitious one (Brian’s Charter, BRC) but you can choose any airline you like from the dropdown — or invent your own and add it, as I did. Then it’s simply a matter of filling in the blanks (I left the commercial flight number field blank, since this is not a scheduled flight). | ||
 |
I chose my
own 777 aircraft, which I added using the Aircraft Editor the
first time I used PFPX, and checked the box for a random
payload. I then clicked Save, and the new flight was added to my
schedule. |
|
 |
||
Notice that unlike the flight above it, the flight we are currently building has no green background at present, since we have a lot of planning to do yet....
Meanwhile, on the right-hand side of the PFPX screen the world map has sketched in the great circle route from Gatwick to Orlando, which will be refined as we proceed. Adding our new flight to the Schedule also results in the “message and action bar” (a cumbersome title, so I’m going to refer to it as the “suggestion bar”, in future) suggesting that my next logical action would be to plan the flight — and even giving me a button to click which starts the process. (As you may have noticed, my specified unit for weights is Kg).
 |
||
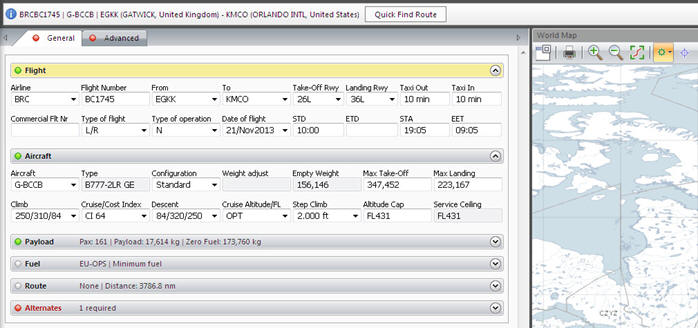
Clicking the circled button results in the Flight tab opening, with an accompanying change in what is displayed on the main panel, and we now have a two-tab screen (General and Advanced), and a new proposal in the suggestions bar: |
||
 |
||
|
You will see that the various fields such as the date and time of the flight have been carried across. The Flight, Aircraft, and Payload sections on the main screen have green buttons (and our random payload has been included), whilst the Alternates tab is red, so there is work to be done there. But first, the suggestions bar indicates that I should do a quick find (advanced options are also available as required) to get a preliminary route, so I clicked the button. The Route tab button now turns green, whilst the suggested route is also displayed on the world map. |
||
 |
||
|
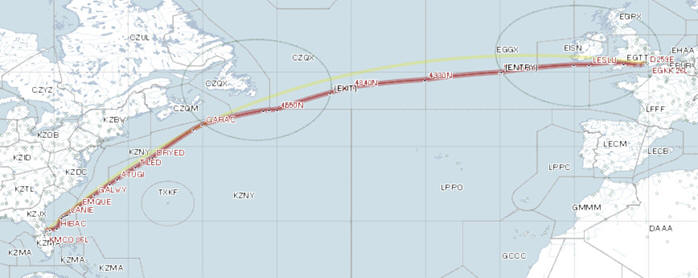
The resulting route shown on the map has some features which I should point out to you: |
||
 |
||
|
Although the final stage of the flight shown will not be over land, it will nonetheless be continuously within 60 minutes’ flight of various adequate airports along the American east coast. But notice also the words (ENTRY) and (EXIT) along the route, which refer to the points at which we enter and leave the ETOPS portion of our flight. Which is all fine, but, of course, it isn’t as simple as that — we also have to take into account the North Atlantic Tracks, so I click the button above the PFPX world map and select westbound tracks, to see how we are doing. |
||
 |
||
|
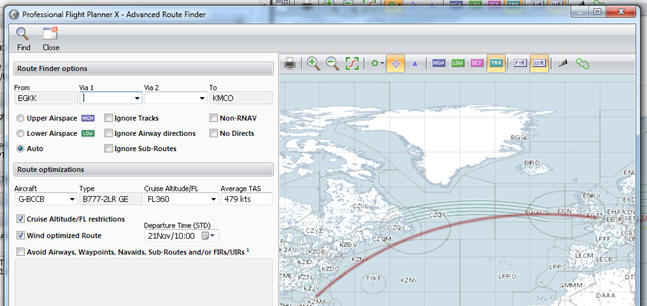
Oops! Well, as you can see, in this case we currently don’t conform to the track system. Clearly, Quick Find may be OK for some flights, but in this particular case we need more control. So I click on the lower half of the Find icon in the Route section of the main panels, and select the Advanced route finder. |
||
 |
||
|
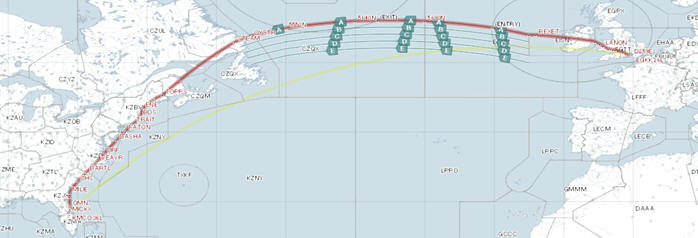
The above options seem good to start with, so I click on Find. That uses the NAT system all right — |
||
 |
||
|
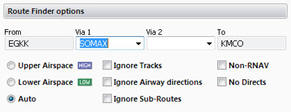
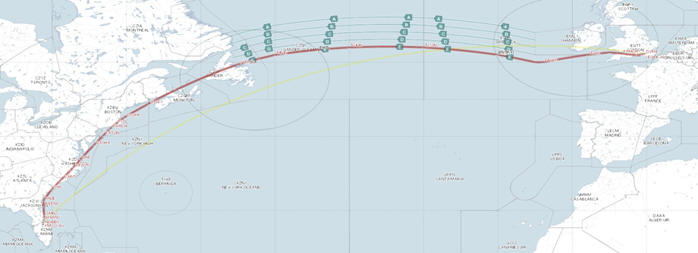
But let’s assume that I would really prefer to use the most southerly track, track E. Clicking on the Tracks tab below the map tells me that the gateway (i.e. the first waypoint) of track E is SOMAX, so I now repeat the advanced find, this time specifying SOMAX as a Via point (as shown, right), but leaving the other options unchanged. This ensures that I now get the route I wanted: |
 |
|
 |
||
|
So far, so good: the next suggestion from PFPX is “Find Destination Alternates”, so again I simply click the button (PFPX actually makes all this seem like fun, which is no mean achievement). The Alternates tab is then populated for me with four quick possibilities, and its button turns green: however, hovering the mouse over each one in turn indicates that their runways are distinctly on the short side for a 777, so instead I once again opt to use an Advanced Find option, this time via the dropdown in the Alternates section on the main panels. |
||
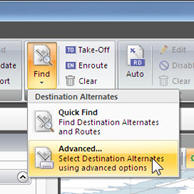 |
That duly brings up the Advanced search options, in which I can specify a minimum runway length. I opt for 10,000 ft, and I am immediately presented with a list of possibilities, sorted into order of increasing distance from my destination. I decide to opt for KTPA: so I click on the checkbox next to it, and then click on Apply, and that’s it — Tampa is now my first alternate in the list: | |
 |
||
You will notice that PFPX has even selected a likely runway for me too, since it knows all about the weather. Perhaps you are beginning to realise why I like this program so much — it definitely takes the pain out of planning!
Let’s take a moment to review where we’ve got to so far. Of all the tabs on the General tab of the Flight, only the Fuel tab now lacks a green button: flight, airline, payload, route, and alternates have all been dealt with. The suggestions bar now says I should check the ETOPS setup on the Advanced tab next, so we’ll come back to the fuel if we need to. (In fact, it has already defaulted to calculating the minimum fuel for us, and so the fuel button won’t turn green until we click the Compute button).
So we move on to reviewing the ETOPS situation. The PFPX manual has a stern note in bold type concerning the Advanced tab:
“Note: The Advanced tab displays additional data that you may have to enter to specify a re-dispatch plan, extended range ETOPS and intermediate alternate airports, a custom altitude/speed profile, and flight plan and air traffic control remarks. These functions are intended for advanced users to refine the flight planning process”.
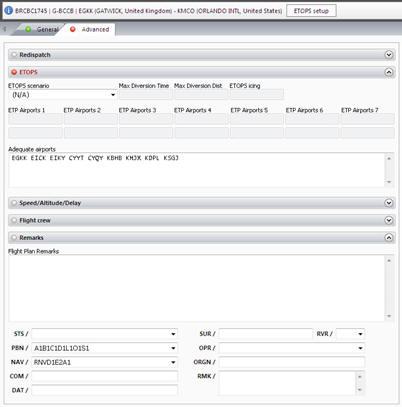 |
The reason for that warning is that when it comes to ETOPS we
usually need to manually intervene. PFPX will do its best to
help us, of course, but we need to make the decisions about
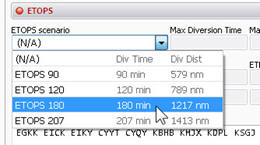
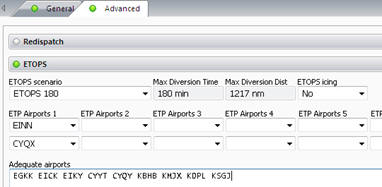
Adequate and ETP Airports. As you can see (left), the Advanced tab is fairly empty when we first meet it, and in order to populate it we will need to understand a few more ETOPS concepts and definitions. The first thing to do is to specify our “ETOPS scenario”, in other words the ETOPS rating of our selected aircraft. My 777 has ETOPS 180 certification, so I opt for that: |
|
 |
(Incidentally, ETOPS 180/207 only covers 95% of the earth’s surface, so don’t incautiously assume that you can fly everywhere…).
So, having selected our ETOPS rating, the fields below it become unlocked for data entry:
 |
If you followed the preceding information about Adequate Airports, I hope you will be interested at this point to discover that PFPX has kindly suggested no less than nine of them for us (note that, depending on the weather, they will not always be Suitable Airports, though). You will notice also that, above them, up to seven airport pairs (or single airports) can be specified, so I’d better explain what those pairs are all about.
First of all another acronym, I’m afraid: ETP. This stands for Equal Time Point, and an ETP is simply a point along the route which is located at the same flight time (again, not distance) from two airports. The point being, of course, that if you need to divert to one of those airports then if you haven’t reached the ETP you go back to the first one, or if you have passed the ETP you press on to the second one. So now you can see why the airports are in pairs....
A brief aside before we continue: if icing conditions are expected for your ETOPS segment, don’t forget to change the ETOPS icing dropdown from No to Yes, so that PFPX can allow for the extra fuel required by anti-ice.
Getting back to the Adequate Airports, if I click on the cloud symbol button above the map (and also remove the Tracks information, for clarity) it will draw the circles which are centred on each adequate airport for us. Owing to the map projection, they won’t look like circles, of course, but they are.
Where they merge, as shown below, you can see a sort of blobby balloon shape once we get near the U.S. which gives us cover all the way down to Miami (from CYYT, CYQY, KBHB, KMJX, KDPL, and KSGJ in PFPX’s suggested list). As we head westwards from Gatwick, we get cover from EGKK, EICK, and EIKY. But those were just PFPX’s suggestions, of course — we can change them as we like, as long as the cover is continuous.
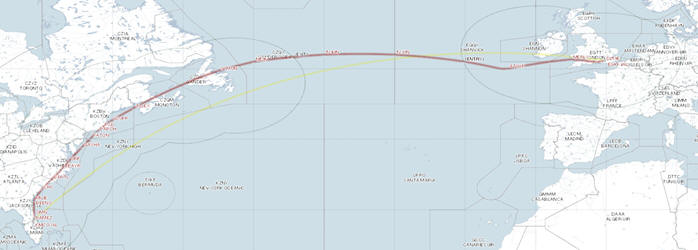 |
However, as we expected, there is a significant portion of our route during which we are not continuously in range of PFPX’s suggested adequate airports, and that is our ETOPS segment — again, you will see that PFPX has shown the (ENTRY) and (EXIT) points on the map.
So to bridge the gap we need to specify pairs of airports which will cover us for the whole of the ETOPS portion of the flight. (You can specify up to seven pairs, of course, but in this case a single pair will be sufficient, as you will see). The obvious option would be to choose airports as close as possible to the start and end of our ETOPS segment and see what cover they provide.
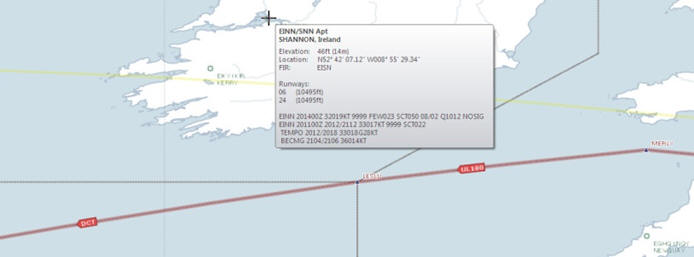
One of the great features of PFPX is that the map is easily dragged, and just as easily scaled using the mouse wheel. So I’ll zoom in to the West of Ireland and see what we have by way of useful-looking ETP airports.
Shannon seems a good bet, and merely hovering my mouse over it shows me the available runways and their length, the weather, and other stuff that it’s comforting to know. (How easy is that! I love PFPX’s graphical approach).
 |
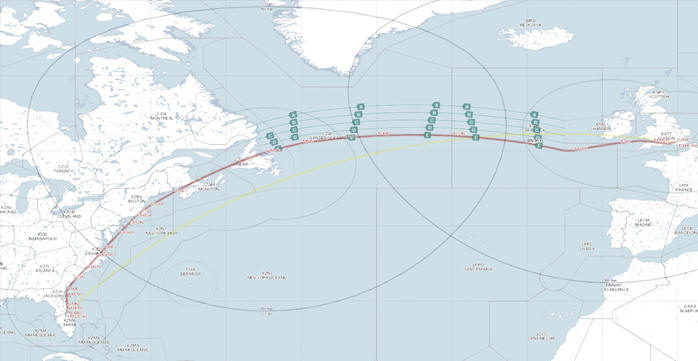
So I’ll add EINN as the first of my ETP Airports, in the box just under ETP Airports 1. PFPX draws the ETOPS 180 circle on the map, and things immediately look better — but there’s still a gap in the route which isn’t covered, though, so I’ll repeat the exercise for the area near to where our route meets the east coast of Canada. This time Gander (CYQX) seems ideal, so I’ll add that as the second airport of the pair (in the box below EINN). Immediately, PFPX draws the relevant circles on the map, and we can see that we are now covered throughout the whole trip:
 |
||
|
The ETOPS and Advanced buttons turn green to indicate that PFPX is happy with our choice, so the ETOPS section is complete. |
||
|
Looking at the map once again, you will see that PFPX
has drawn the large 180 minute circles around our two
ETP airports, and also the 60 minute circles around our
Adequate Airports. The important thing is that there is now complete coverage of our route both using the adequate airports and our chosen ETP airport pair, which is why PFPX has turned the button green for us to proceed. |
 |
|
Just before we do proceed, though, here’s a few more relevant definitions and acronyms for you:
Extended Range (ER) or ETOPS Operations:
Extended range operations are those operations conducted over a specified route that contain a point further than 60 minutes’ flying time at the approved one-engine-inoperative cruise speed (under standard conditions in still air) from an adequate airport.
ER Entry Point (EEP)
The EEP (Entry Point) is the point on the aircraft's outbound route beyond which the aircraft is no longer continuously within 60 minutes flying time at the approved one-engine-inoperative cruise speed (under standard conditions in still air) from an adequate airport.
ER Exit Point (EXP)
The EXP (Exit Point) is the first point on the aircraft's inbound route where the aircraft is continuously within 60minutes flying time at the approved one-engine-inoperative cruise speed (under standard conditions in still air) from an adequate airport.
ER segment
The extended range segment starts at the EEP and ends at the EXP.
ER Sensitive Event
An ER sensitive event is any occurrence that could be detrimental to ER operations including but not limited to, in-flight shutdowns, diversions or turn-backs, un-commanded power changes or surges, inability to control the engine or obtain desired power, and problems with systems critical to ETOPS operation.
(That’s it — I won’t weary you with any more, I promise).
So hopefully, you now understand the significance of not being more than 60 minutes from an adequate airport, as well as the circles drawn at 180 minutes’ range from your Equal Time Point airports. And if you found my explanation of them to be somewhat terse (which, indeed, it was), you can find a much better one at the beginning of the two-part pdf tutorial (links given above).
There are more things that we could add to the ETOPS tab information, but there is just one that I will mention here. When we are cleared along the NATs we are usually assigned a specific speed and altitude. If I don’t notify PFPX about that it will assume that I will be using step climbs along the way. So I click the down arrow to open the Speed/Altitude/Delay tab on the Advanced page and enter the information as shown below:
 |
We could now compute the flight, but just before doing so I’d like to return to the fuel tab to check the fuel policy being used. |
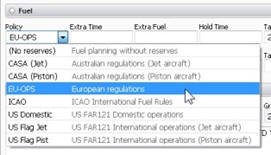
That’s easy — my aircraft is EU-OPS (and will be so regardless of where in the world I am flying), but you need to choose the appropriate option for your circumstances from the dropdown. As you can see from the screenshot below, there are several other options available: the rule is the usual simple one — if you know what it is and why you need it, put it in. The release fuel defaults to minimum (most of the time you don’t want to carry more weight than you need, because then you will tend to use more fuel) but again, you have the options to take MAX fuel if you wish, or else specify the remaining fuel you wish to have on board at the end of the flight (maybe it’s especially expensive at your destination airport?).
| Once you have finished checking your fuel requirements, all that
remains for this phase is to click on the Compute Flight button
in the suggestions tab, and allow PFPX to crunch the relevant
numbers for us. That has been a very quick tour of the flight planning phase, I’m afraid: but on that basis PFPX will generate your flight plan for you, so it now shows us the Results tab. |
 |
|
 |
||
Flight planning — the results
You can now click on each of the tabs to the right of “Results” to review the outcome of your labours so far. The Details tab will show you the fuel planning results; the OFP tab will show you your flight plan; and the other tabs will do more or less what it says on the tin, oops sorry — the tab. But you now have yet more options....
| If you look at the main panels at this point you will see some interesting possibilities. Release, Re-plan, and Delete are all pretty obvious, but the next two enable you to send the details directly to TOPCAT (if you have it) in order to calculate the take-off performance data, including the all-important de-rate, and the landing data. But unfortunately, in this particular case there’s a snag. |
 |
The author of TOPCAT is the same person who wrote PFPX, and so for some considerable time TOPCAT has not been updated whilst he has been working on the flight planning program. So if I try to use TOPCAT to calculate my take-off or landing data, this happens:
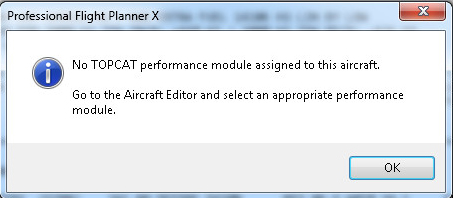 |
Most unfortunately, there is no 777 in TOPCAT as yet, so both modules can’t be used together for that aircraft. (Obviously, TOPCAT can’t calculate 777 performance standalone, either). If I was using the PMDG NGX, for example, then all would be well, but until the data for the 777 is made available, then TOPCAT can’t be used, which really is a pity. Since the 777 is probably the best long-range aircraft currently available to simmers, the inability to use it with TOPCAT is keenly felt. |
Moving on, we find the results output box and then three small icons: Save (which is obvious), Validate, and Export — and it is these last two options which I now need to describe. Let’s look at Validate first. When you click on the icon a new window opens up. I said I’d spare you from more acronyms, so I will restrict myself to saying that by clicking on Validate you can check that your route is compliant with the flow management restrictions of Eurocontrol. PFPX processes your request, and in the end you either pass or fail — in which case you will receive one or more error codes, and these you can use (by means too labyrinthine to include here) to determine the source of the error — such as missing a mandatory flight segment — and then fix it. There is a pinned post on the PFPX forum pithily entitled “CFMU validation errors and using PFPX auto routing to fix them” which can help you in this eventuality.
The Export icon is the means by which you send your flight plan to your aircraft of choice: more details below.
Finally, the suggestion bar provides you with a button to release the flight, and here is a partial sample of the output (a full example flightplan of a longer trip is also available for download with the pdf version of this article, at the end of the review):
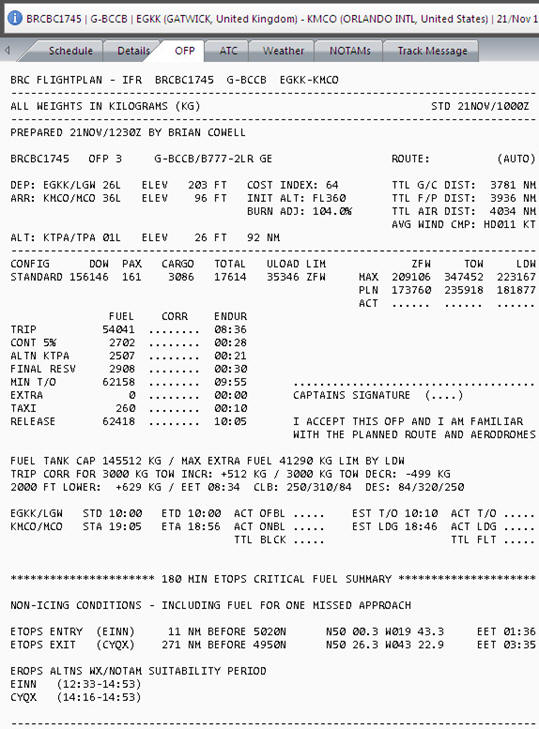 |
(There is much more output than that, of course, and furthermore you can tailor the output format to your own requirements, as previously mentioned. There are also some convenient buttons on the print dialog to enable you to select which parts of the whole flight plan you wish to commit to paper).
You need to be aware that certain parts of this information have to be transferred across to the aircraft which you will now use to fly the flight. If you specified a Cost Index (something which I didn’t cover, but to do it you enter the CI into the Cruise/Cost Index field on the Aircraft tab) then it is your responsibility to ensure that you enter the same Cost Index into the CDU, as well. Similarly, you need to enter the amount of fuel (RELEASE, above) that PFPX has stipulated, along with the reserves figure (i.e. ALTN + FINAL RESV), and furthermore set the ZFW to match. Your cruise level should be as specified by INIT ALT, and so on.
 |
 There’s one thing I should mention before we move on: if you are using the PMDG NGX or 777, prior to exporting the route you must ensure that it contains no SID or STAR information, since otherwise it will be rejected. To make certain of this, just open the Route Editor and change the SID and STAR box information to blank ( -- ), then click Apply. Once you are ready, and have printed or saved your route, you can then export it to your various add-ons, as mentioned above. You have a wide choice of export targets and formats, as you can see. (Xplane is also included, but wouldn’t quite fit into the window) — |
|
 |
||
Accuracy of the fuel estimate?
The obvious question that is bound to be asked is concerned with the accuracy of the fuel predictions. I can only say that my experience has been that it has generally been within around 2% (which I am very happy with) — although there are two things you need to bear in mind.
1. You have to be careful to align the values in your FMC with the figures from PFPX, or your results are bound to be wrong.
2. To achieve real accuracy you must enter or export the winds into your FMC, too, after ensuring that both PFPX and your aircraft are using
the same weather data source.
I should add also that if you feel that your particular marque of simulated aircraft consistently differs from the PFPX figures, PFPX provides you with the ability to enter the Aircraft Editor and use the Evaluate function to have PFPX suggest a better value for you Here’s the Aircraft Editor page and the Evaluate button —
 |
| I haven’t tried this myself, but allegedly you can click the
Evaluate button and then enter the relevant figures into the
Bias Evaluator (right) — as you can see, there are a number of
them, and you need to take those readings whilst in stabilised
cruise flight at your normal cruise altitude. Having entered the figures, click on Apply and the new Bias figure will be calculated (the figure in use is shown on the OFP as “BURN ADJ”). But to be honest, so far I haven’t got too worked up about a few Kg of simulated fuel, although it’s great to be able to know before take-off that your fuel predictions will be more or less spot-on. |
 |
I have been using PFPX since it was released, and I have to say that as updated versions have come along it has gradually become one of my favourite products. To be fair, I have always taken my flight preparation very seriously (to excess, some might say) and so perhaps my deep appreciation of what PFPX can do is not necessarily shared by everyone. But then, if you’re not too interested in accurate flight planning it seems unlikely that you will buy the program; and for that matter you probably won’t have made it through the review to this point.
Even though the above walkthrough of the program’s features was taken at speed, hopefully you will now have some idea of PFPX’s power. What is almost impossible to convey in a review, however, is all the clever stuff that it does in the background. When I first started to use it, I found myself constantly cross-checking and making mental notes to do things — only to find that PFPX had quietly done them for me, without making the slightest fuss about it. The long development time has clearly paid off in terms of usability, and now that a few rough edges in the initial releases have been smoothed away (this review is based on v1.11) the program’s polish is really beginning to shine.
There has never been anything like this available for simmers. My memories go back to the first real attempt at something similar which was produced by Doug Snow (a dispatcher whose name you will frequently encounter on the PFPX forum) in the form of a massive Excel spreadsheet, and that was well over ten years ago — not to mention FSBuild, Flightsim Commander, and all the other worthy attempts since. But none of them have ever approached PFPX’s ability to make ETOPS planning so amazingly easy — and also so much fun! Whilst it’s straightforward enough to find any old route from A to B, either from the Internet or elsewhere, the fulfilment of thoroughly planning one for yourself taking into account the prevailing winds, oceanic tracks, and so on is considerable, and the result definitely enhances your enjoyment of the subsequent flight, as well as the satisfaction which you derive from it.
OK, I do have to come clean and admit that when it comes to selecting the SID and STAR I get some help from Aivlasoft EFB as well (it’s a brilliant program for being able to graphically see the results of different approaches), but that apart I now use PFPX exclusively for all my planning, and can wholeheartedly recommend it.
But of course, nothing is perfect. The PFPX manual is a mere sketch of what it might have been — and arguably should have been, for a product of this complexity. But happily the various videos which have become available, and especially Belisar Hoxholli’s excellent two-part tutorial pdf, have done much to remedy that deficiency.
And although charging for access to the winds, METARs, TAFs, and oceanic tracks data that PFPX needs does seem hard to justify, the charges don’t begin for a year, and at around one Euro a month they are far from extortionate.
Also, whilst the list of supported aircraft is a fairly long one, it must be said that there are a number of rather notable omissions as seen from the simmer’s perspective — including PMDG’s J41, Aerosoft’s Twin Otter, Majestic’s Dash-8 Q400, FlightsimLabs’ ConcordeX, QualityWings’ BAE 146, and others.
But for me, the biggest disappointment was the mismatch between the aircraft that PFPX can plan for and those which are available within TOPCAT. It seems so obvious, especially given the timing of the release, that the PMDG 777 would be one of the main aircraft first used with the new long range planner that the failure to also provide support for it within TOPCAT seems positively perverse. Whilst I do realise that PFPX and TOPCAT are developed by a small team, and also that acquiring the performance data for such aircraft is a difficult and complex business, nonetheless from a marketing point of view the mismatch between the two programs seems most unfortunate.
Nonetheless, Rome wasn’t built in a day (but I wasn’t in charge of that job), and so I am content to wait whilst PFPX gradually remedies the few remaining gaps in its considerable arsenal of features and becomes the standard for flight planning within the flight sim community — as I am sure that it should. Speaking as someone who has been involved in software development since the days of punched cards and paper tape I must also acknowledge the considerable feat of software development that PFPX represents, especially given the size of the development team.
| Verdict: |
 |
|
| • Ease of use: | 9.5/10 | |
| • Features: | 9.1/10 | |
| • Documentation: | 8.6/10 | |
| • Performance: | 9.3/10 | |
| • Value for money: | 9.8/10 |
| Mutley’s Hangar score of 9.3/10, "Highly recommended" and a Mutley's Hangar Silver Award. |
Ease of Use: 9.5 out of 10
The unavoidable steep initial learning curve for this product
has been remarked upon during the course of the review. However,
although considerable and praiseworthy efforts have been made to
make the program easier to use — notably, by means of the
incorporation of the “suggestions bar” and also the red and
green buttons on the various sections — in a few places the
interface is irritatingly counter-intuitive, such as when
editing the add-ons’ locations on the route export screen, for
example. But overall, the complexity is easily navigable.
Features: 9.1 out of 10
It seems positively niggardly to give less than full marks to
the program under this heading, but the score awarded has to
take into account the missing aircraft which it arguably should
have supported on release, but particularly the patchy
corresponding aircraft support within TOPCAT which so frequently
mars the advertised integration with that program.
Documentation: 8.6 out of 10
The minimalist nature of the supplied manual is unfortunate. If
ever a program deserved a comprehensive manual that described
the why and the when as well as the what, it is PFPX.
Unfortunately, this score has to be based upon the documentation
supplied with the product, and so the availability of the
two-part tutorial and the videos cannot be taken into account,
even though they do much to mitigate the official manual’s
shortcomings.
Performance: 9.3
In the context of PFPX, this category refers to how well it
achieves what it sets out to do. In most respects the product is
excellent, but because of the fact that PFPX has been presented
as allowing flight planning integrated with performance data
(using TOPCAT), there is still some way to go in this respect
before it can be scored more highly.
Value for money: 9.8 out of 10
This is never an easy category to score in the case of a utility
such as PFPX, since the value derived from it largely depends on
who is buying it. However, I think it is safe to assume that no
one is going to buy this product who is not extremely interested
in the subject of long range flight planning; so on that basis,
and especially given its unique features which have never been
available to simmers previously, it gives splendid value for
money.
Award: 9.3 : “Silver Award – Highly Recommended”
Offline version
![]() MH PFPX review .zip 2.79Mb
(Includes example flight plan)
MH PFPX review .zip 2.79Mb
(Includes example flight plan)
![]()
Brian Cowell
Review machine Spec: Intel i5 760 O/C 4GHz |
16GB DDR3 RAM |NVidia GTX670 FTW GFX Card |Windows 7/64
