Introduction
~ Never has a title been more anticipated and with good reason.
Horizon Simulation have developed the stunning area of Southern
Scotland with a remarkable 60cm resolution throughout, twice the
detail of England & Wales. Of course, such breath-taking scenery
requires the same attention to detail and so this scenery comes
complete with the highest mesh terrain available for FSX, namely
5m. The result is … well spectacular.
Designed to be flown between 600 – 5000 feet the results are
astounding and with the complementary Treescapes and VFR Airfields
Scotland titles released around the same time, you can fly over the
Scottish hills and valleys, swooping low over the tree lines
before landing at all of the airports and airfields all blended
together. ~ Flightstore
~~~~~~~~~~
| Well, it was quite a wait, but at last we have some Scottish VFR scenery, from Playsims Publishing/Horizon Simulation, using digital terrain data from Getmapping PLC. | ||
|
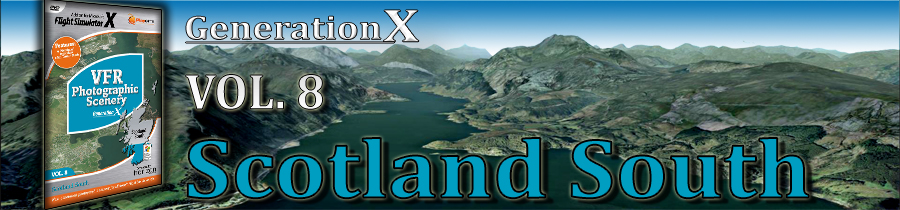
Scotland South is Volume 8 of the fantastic Generation X series to
come from Playsims and it’s a pleasure for me to bring you this
review which, I hope, will give you a good insight into what
Playsims have been doing for the last few months. Volume 8 will merge seamlessly with the already widely used, Generation X Southern, Central and Northern England/Wales Volumes 1, 2 & 3 . Volume 8 comes on a staggering 7 DVDs, with a whopping 16.1Gb of scenery in total, so you need space on your hard drive to accommodate this volume. The recommendation for hard drive capacity is 56Gb. |
 Ben Lomond |
|
Before I venture any further I should point out that Volume 8, Southern Scotland, demands a fairly well equipped machine to perform at its best. Here is the information supplied by Horizon Simulation.
Software:
VFR Generation X is designed for use with Microsoft Flight Simulator X. In order to use this add-on scenery, you must have one of the following versions of this simulation installed:
- Microsoft Flight Simulator X (Standard Edition)
- Microsoft Flight Simulator X (Deluxe Edition)
Please note that VFR Generation X is compatible with Service Pack 1, Service Pack 2, and Acceleration. You must have at least Service Pack 1 installed in order to display the scenery correctly.
Hardware:
Flight simulation software has come a long way since the first titles were released for early computers. Each successive incarnation has demanded more and more from the technology available and has provided an increasingly more accurate and realistic simulation. In fact, it is fair to say that the realism of simulation software is limited not by the abilities of the software programmers that design them, but by the technology available to the consumers that use them. As a result, although Microsoft Flight Simulator is designed to be used on PCs which span a broad range of system specifications, with all of the display options configured to their maximum settings, the simulation is capable of fully utilising all of the system resources available to even the most sophisticated computer hardware.
Achieving optimum performance with Microsoft Flight Simulator therefore requires a reasonably high-specification, well maintained Windows compatible PC and some attention to tuning the software/hardware (see the Optimising Performance section of this manual for more information). The Minimum and Recommended system specifications for using this software are provided in the table below.
| System Specifications | Minimum Specifications | Recommended Specifications |
| Operating System | XP(SP2)/Vista/7 | Windows 7 |
| Processor | 1.8 GHz | 2.5+ GHz |
| RAM | 1024 MB | 2048 MB+ |
| Hard Disk Space | 56 GB | 56 GB |
| Graphics Card | 256 MB | 1024 MB+ |
| Graphics Controllers | DirectX 9.0c or later | DirectX 9.0c or later(Shader Model 2.0) |
| Other | DVD Drive | DVD Drive |
Installation
The installation process is as you would expect. That being said, Volume 8 does take some time to install being on 7 DVDs. Patience though does pay off.
It would be prudent to firstly make sure you have sufficient space on your hard drive and secondly, to defragment that particular hard drive before you commence the install.
As with all the other Generation X series and other large coverage photographic scenery packages, Volume 8 is no different in that the space required to install is considerable space.
Defragmenting your hard drive will ensure that the scenery files are placed on the hard drive in the most efficient manner during installation and significantly help the smooth running of the software when in use.
My installation went smoothly and I experienced no problems. Having said that, I have in the past had problems when trying to install other large software packages. When that happened I copied all the content onto my exterior hard drive and installed from there. Thankfully that was not the case with Volume 8, Southern Scotland. (Thank you Horizon/Playsims).
What you will install:
0.50m Photographic Scenery:
Since the coverage area covered by each of the 3 volumes for Scotland is somewhat smaller than that for the England & Wales volumes in the VFR Generation X series, disk space savings have allowed us to generate the scenery at 0.50m/pixel, as opposed to 1.2m/pixel (the maximum display resolution of the products covering England & Wales). The result is a very much more detailed scenery for you to enjoy with your flight simulation. The 0.50m/pixel photographic scenery is part of the default installation.
Note:
Since the Earth is approximately spherical, resolution in metres/pixel increases with latitude (as the great circle lines converge). At latitudes as far North as those of Scotland, the resolution of the aerial photography therefore actually increases to c. 0.5m/pixel, instead of the 0.6m/pixel data provided at latitudes parallel with England & Wales
5m Terrain Mesh:
The terrain mesh provided with VFR Generation X uses the most detailed and accurate data available - 5m/pixel. The terrain mesh, provided at this level of detail, adds significantly to the realism of the scenery, however file sizes are relatively small, when compared with the photographic scenery. For these reasons, the 5m terrain mesh is also a default installation option with this product.
Vectors:
The ‘Vectors’ folder provided with the installation improves the appearance of the photographic scenery when overlaying the default scenery and is required by the installation.
Airports:
Since the resolution of the terrain mesh is so high in VFR Generation X, Microsoft’s assumption that airfields are flat within the perimeter area results in a ‘step change’ correction from the assumed altitude to the real altitude depicted by the terrain, resulting in airports appearing to reside on plateaus, or in troughs. Furthermore, the geographical inaccuracy of the placement of default airport tarmac and buildings is obvious when overlaid on top of the aerial photography. As a result, each of the airports within the scenery area has been appropriately blended and re-positioned, to ensure optimal fit with the photographic scenery.
Night Lighting:
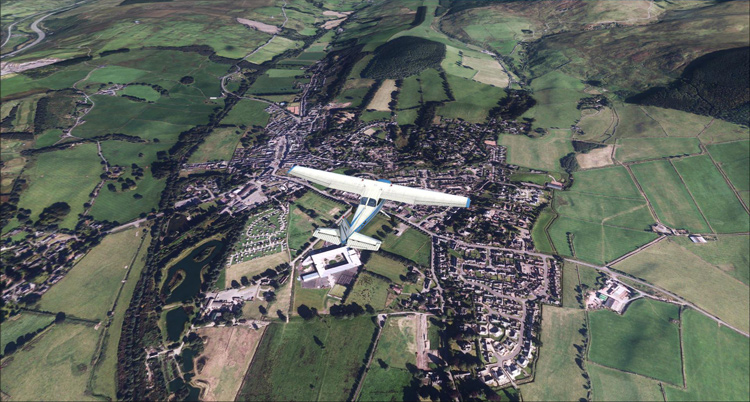
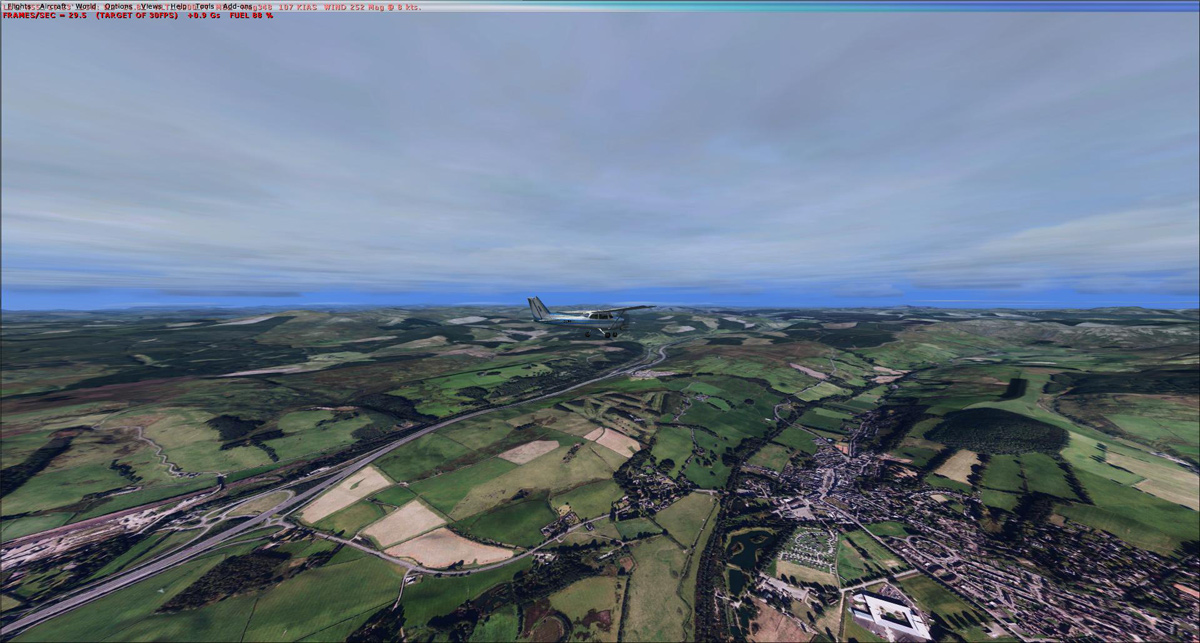
Unfortunately night lighting is not included in Volume 8. This picture was taken in Summer at about 1am but I have lightened it so that you can see the lovely town of Moffat.

This is Moffat during daylight.
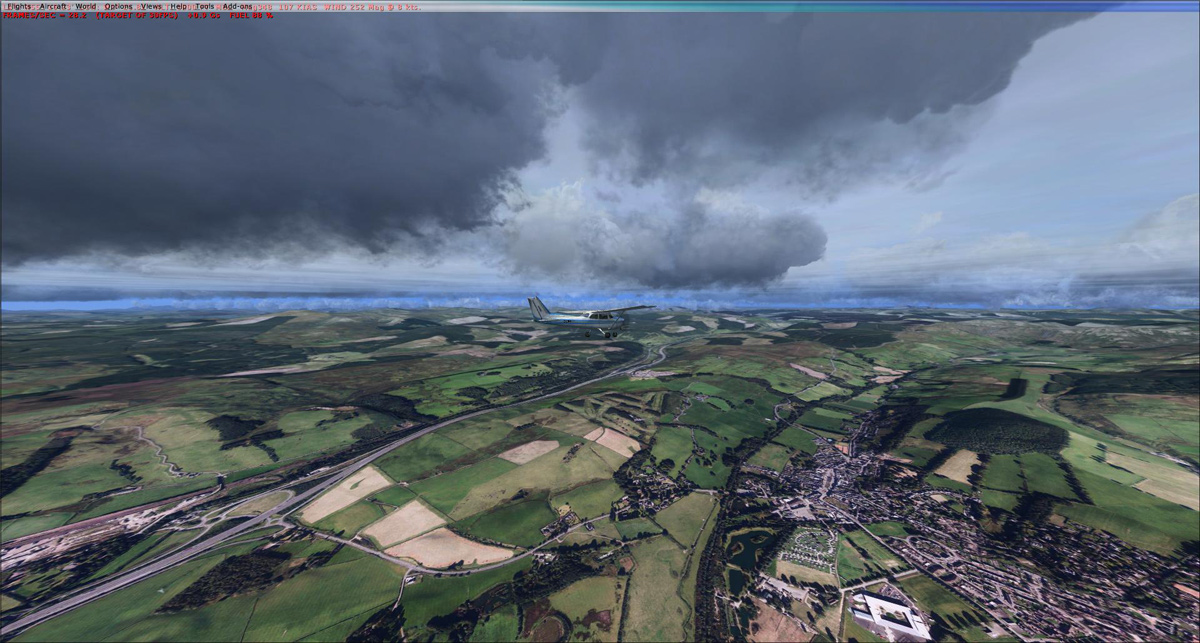
Although there is no Night Lighting included with Volume 8, it is possible to achieve it with the use of UTX Europe. I also set both my Scenery Complexity and Autogen Density to Very Dense. This is only possible with a high spec’ machine and still retain decent frame rates.
Here is the result I achieved flying over UK2000 Cumbernauld
Extreme.
.jpg)
Display Settings:
As we know now, it’s just not feasible to have all the
Display Setting sliders set to maximum, it is best to follow the
advice in the Volume 8 manual. As with any of the Photographic
Scenery add-ons on the market at the moment, it is pretty clear
that it’s not possible to have all the display settings sliders
set to ‘Max’. Even those with the highest specification computers
available today, may be pushing the limits of performance to set
all the sliders to maximum without noticing some degradation in
performance and poorer frame rates.
The advice given in the manual is as follows but it’s up to you,
to experiment with the slider settings to gain the best
performance and frame rates for your particular setup.
Note:
Where ‘User Preference’ is stated, the option has minimal impact
on frame rates or visual quality of the scenery. As a result, it
is up to you how you would prefer to set that option. Where ‘OFF’
is recommended, the setting has a considerable impact on frame
rates and/or scenery quality.
Graphics:
The settings on the graphics tab govern the way that Flight
Simulator works with your graphics card. These settings can
therefore have a significant impact on performance and MUST be set
appropriately if you wish to get the most out of VFR Generation X.
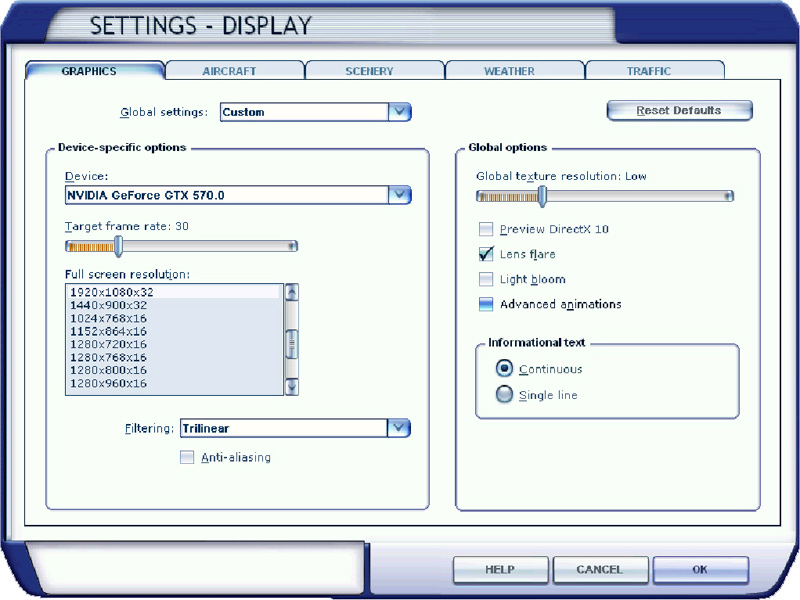

Notes:
1. The full screen resolution that you can choose will depend on two
things: the maximum resolution of your monitor, and your system’s
specification. The first two numbers here (e.g. 1024 x 768) refer
to the number of pixels (width x height) that you would like FSX
to use for your visual display. The higher these numbers are, the
greater the definition of the display. The third (e.g. 32) is the
colour depth (32 = 32-bit for example). Each of these numbers will
have a considerable impact on system performance and therefore the
full screen resolution is a balance between performance and visual
quality. The recommendation above will be appropriate for most
users however we would encourage you to experiment with this
setting to determine how your own system performs at different
resolutions.
If you have problems with performance (e.g blurry textures/poor
frame rates), try turning Anti-Aliasing OFF to see if this helps.
2. This setting also controls the level of detail of 3D objects.
Therefore, when flying with 3D object sceneries, you should
experiment with this setting and seek to strike a balance between
performance and texture quality on 3D objects.
Aircraft:
On the AIRCRAFT tab, you should set the following:
| Cockpit settings: Default cockpit view: User Preference Show cockpit ToolTips: User Preference High-resolution 3D virtual cockpit: User Preference 2D panel transparency: User Preference |
Exterior settings: Aircraft casts shadows on the ground: User Preference Aircraft casts shadows on itself: User Preference Aircraft landing-lights illuminate ground: User Preference |
Scenery:
Recommended Scenery Tab
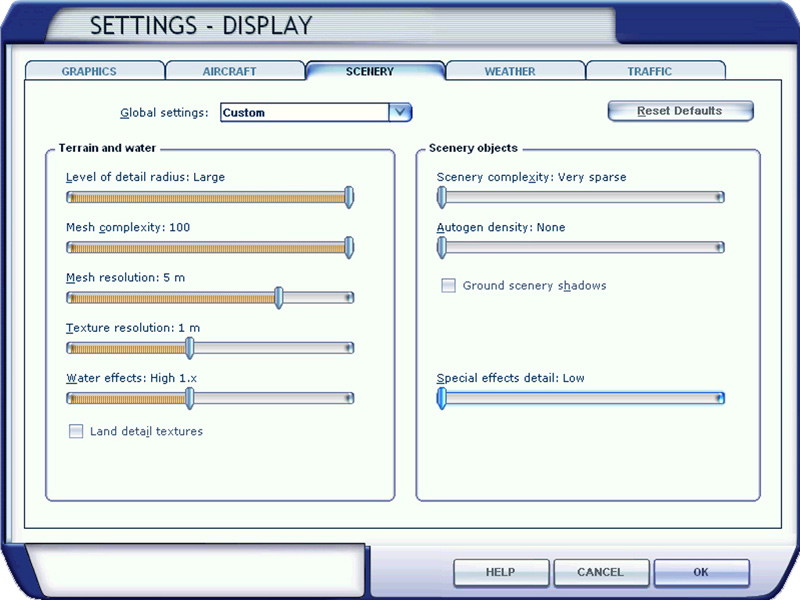 |
My Scenery Tab
 |
| On the SCENERY tab, you should set the following: | |
| Terrain and water: Level of detail radius: Large (see Note 1) Mesh complexity: 100 Mesh resolution: 5m (for full detail terrain mesh) Texture resolution: 7cm Water effects: High 2x (depending on your system performance) Land detail textures: OFF (Unchecked) |
Scenery objects: Scenery complexity: Very sparse (see Note 2) Autogen density: None (see Note 3) Ground scenery shadows: OFF (Unchecked) Special effects detail: Low (see Note 4) |
IMPORTANT:
FSX provides you with a few new options to set the quality of the scenery that it will display. These settings limit the level of detail of the scenery and can significantly affect performance/visual quality, therefore they MUST be adjusted as specified above in order for you to enjoy VFR Generation X at its best.
Notes:
1. Level of detail radius governs the distance from your aircraft that high-detail scenery textures and 3D objects are displayed. Effectively this means that when you are flying with the photographic scenery, Flight Simulator will display more detail in the mid to far distance, which results in crisp, sharp photographic scenery out to the horizon.
If used in conjunction with a sensible visibility (e.g. 10 to 20 miles) the impact on frame rates is minimal when using photographic scenery alone, however when using 3D objects too (e.g. Autogen), then Level of detail radius can have a dramatic affect on frame rates. As with other settings in Flight Simulator, we would recommend that you experiment to determine its effects on your system.
2. Scenery complexity governs the level of detail of airports and other 3D objects in Flight Simulator. 3D objects consume a great deal of your system resources and as such we recommend that you initially set the Scenery complexity to ‘Very Sparse‘. Once you’ve managed to achieve acceptable performance with the photographic scenery, this is one setting that you might like to experiment with to determine whether any noticeable adverse effects occur.
3. Autogen is disabled by default when using the photographic scenery. The reason for this is that VFR Generation X uses real aerial photography and shows real buildings on the ground, whilst Autogen places generic 3D objects (e.g. houses and trees) in semi-random locations which do not line up with the aerial photography.
4. Special effects (e.g. water ripples) can be very resource intensive and should be minimised initially to allow you to attain acceptable performance with the photographic scenery. Special effects detail is another experimental setting for you to try once you have achieved good performance with VFR Generation X.
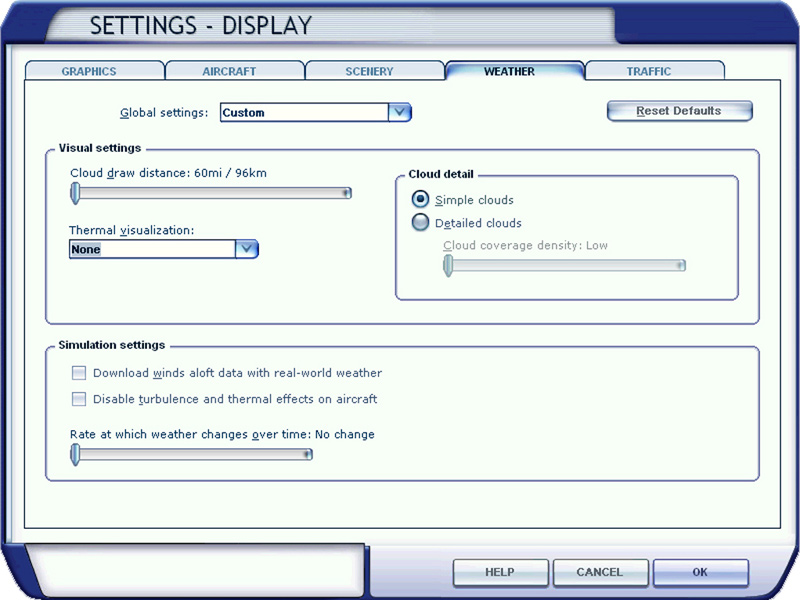
Weather:
Recommended Weather Tab
 |
My Weather Tab
|
| On the WEATHER tab, you should set the following: | |
| Visual settings: Cloud draw distance: 60mi/96km Thermal visualisation: None Cloud detail: Simple clouds (see Note 1) |
Simulation settings: Download winds aloft data with real-world weather: User Preference Disable turbulence and thermal effects on aircraft: User Preference Rate - weather changes over time: User Preference (see Note2) |
1. Cloud detail (cloud density), like other weather settings, requires a great deal of your system’s resources. The more dense and detailed the clouds, the more likely you are to experience adverse performance effects on frame rates and scenery quality. Again, the theory here is to start with lower levels of detail for features that will consume processing power that may be required by the photographic scenery, then experiment to find the balance between features and performance of your own system.
2. Since weather will change with time, it is recommended you initially set Rate at which weather changes over time to No change to prevent memory intensive weather systems creeping in and adversely affecting your frame rates.
 |
 |
| Moffat in the Border Region of Southern Scotland | |
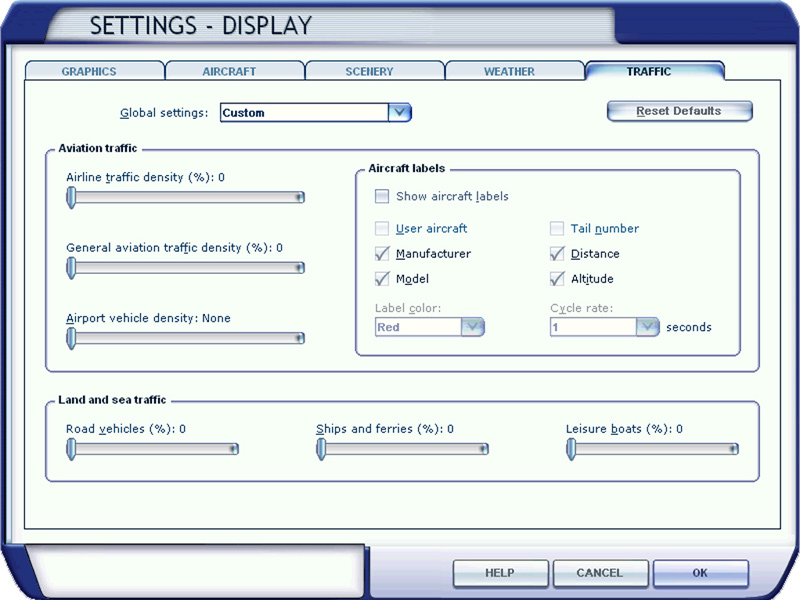
Traffic:
Recommended Traffic Settings
 |
My Traffic Settings
|
| On the TRAFFIC tab, you should set the following: | |
|
Aviation traffic: Airline traffic density: 0% General aviation traffic density: 0% Airport vehicle density: None |
Aircraft Labels:
Show aircraft labels:OFF (Unchecked) Land and sea traffic: Road vehicles: 0% Ships and ferries: 0% Leisure boats: 0% |
Optimising Performance:
Flight simulation can place heavy demands on your system. This is
especially so when using VFR Generation X. As a result, you may
need to evaluate your system settings, update your drivers, apply
operating system patches, and generally experiment to get the best
from Microsoft Flight Simulator X.
As you can see from the screen shots above I decided what I could
get away with and still get acceptable frame rates. I set my frame
rate at 30 and whilst using Generation X Volume 8, I was still
able to achieve a respectable 29-30FPS. If I set my sliders almost
all to Max’ I was getting around 50-60fps. Bearing in mind I have
a very good system specification. Do experiment by setting your
sliders to their minimum and work your way up to see what you find
acceptable given your system spec’s.
You may be surprised just how far you can actually set them.
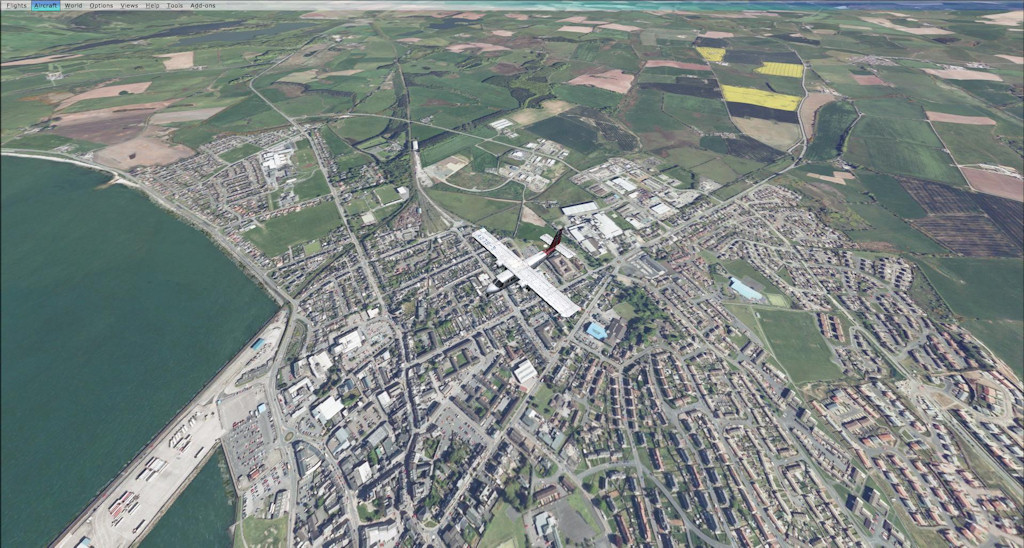
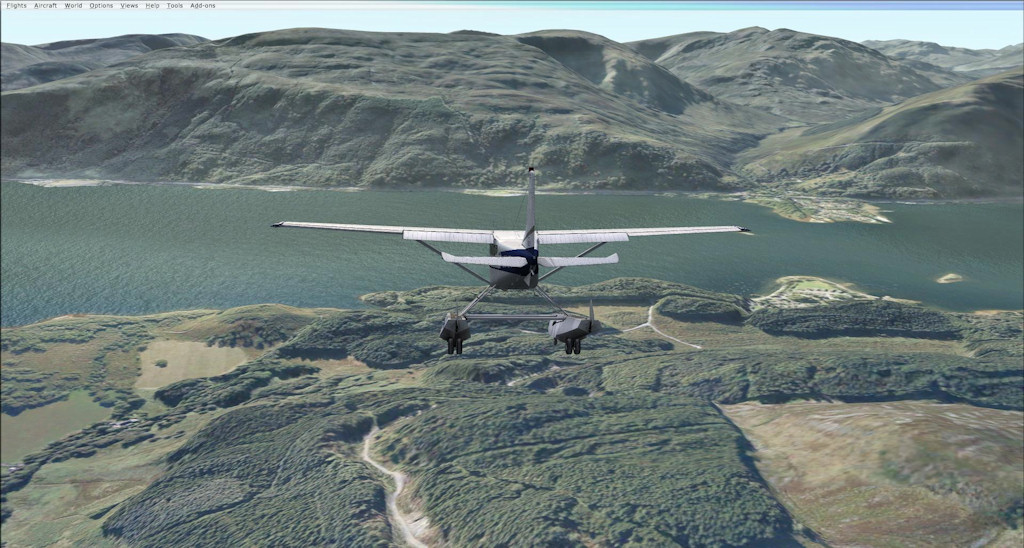
Area Covered By Vol. 8: |
As you can see from the map, the area covered with Volume 8
extends from the border of England and Scotland north to
approximately the north shores of Loch Fyne and from Islay on the
west to Crail and the Fife to the East. Horizon and Playsims have pulled out the stops on this volume, as although it is only the Southern region of Scotland, the attention to detail has not been compromised. It is a joy to fly over. The picture to the left shows this coverage. As you can see below, the photographic scenery out performs the default scenery and is much much more pleasing and realistic to fly over. |
 Loch Fyne |
 England / Scotland Border |
Photographic sorties were flown only in the best light and weather conditions (to ensure the highest quality imagery) and during the summer months (to minimise seasonal variations in the colouration of vegetation and the length of shadows cast). As a result, you will find that the aerial photography looks best in flights during the summer months and towards the middle of the day – reflecting the conditions in which the source imagery was acquired.
You can of course fly with the photographic scenery at any time of day and in any season. However, since the source photography was not acquired for every season and time of day, Microsoft Flight Simulator will simply apply variations of colour and brightness accordingly, simulating such effects.
 Summer |
 Winter |
| As you can see, not a great deal of difference. | |
Pros and Cons:
Pros:
•Smooth frame rates with crisp, sharp photographic scenery.
•Translucent, highly detailed water textures on all water bodies let you see beneath the water’s surface, providing moving and reflective
water effects - excellent for float airplane flights.
•0.50m Photographic Scenery
•5m Terrain Mesh
•Compatibility with FSX Service Packs 1 & 2, and Acceleration Pack.
•Compatible with UK2000 Airports (Glasgow Extreme and Edinburgh Extreme).
•Compatible with Scotflight Scenery.
•Superb level of detail.
•Well documented 33 page PDF Manual.
Cons:
•No Night Lighting
It is a pity that Night Lighting isn’t included in this volume but then we would have had to wait even longer for the release. Having said that I’m sure, at some point in the future, we will see an update which may include night lighting. For that, we will have to wait and see. It really doesn’t detract from the overall enjoyment of Volume 8.
For any help with Volume 8 or any other Generation X Photographic Scenery visit the forums using the link below.
One other problem I encountered was that, whilst flying, the screen appeared a little too bright, see below.

After a short skip to the help forums , I found a link to a
small file called ENBSeries.
I downloaded the .zip file and installed it. Then during flight
you press Shift+F12 and the file runs making the screen look
slightly darker with slightly more saturation. I was happy with
the initial results but if you are not happy, you can alter the
settings from within the ENBSeries file structure as described in
the help file.
The ENBSeries .zip file can
also be located in the file library of Mutley's Hangar linked
via the forums, here is the after shot:

Not vastly different, but enough for me to want to use the
ENBSeries modification. You can also turn on/off the effects in
flight by using the Shift+F12 keys.
Conclusion
Reading the various forums on-line, there appears to have been
several small problems with Vol.8 although having said that, I
only encountered the ones I have pointed out above. If you have
any other problems I suggest using the link below to access the
Playhorizon Forum. You should find any answers you may need in one
of the sub sections there.
Having spent many holidays in both North and South Scotland, I can
honestly say that I can recognise almost everywhere I have flown
using Volume 8, Southern Scotland. The attention to detail is
quite unparalleled in this scenery package. From the coastal areas
to the hills, mountains and lochs of the inland, you will not be
disappointed. There is a place for everyone to explore in Southern
Scotland. I would suggest that you fly low and slow, to get the
very best from this latest addition to the Generation X VFR
Photographic Scenery Library.
I’m quite
confident that you will enjoy what Volume 8 has to offer
and I for one can’t wait to see the next productions from Playsims
and Horizon Publishing and I’m hoping that we see Northern
Scotland added very soon thus completing the Scottish Scenery for
us all to enjoy.
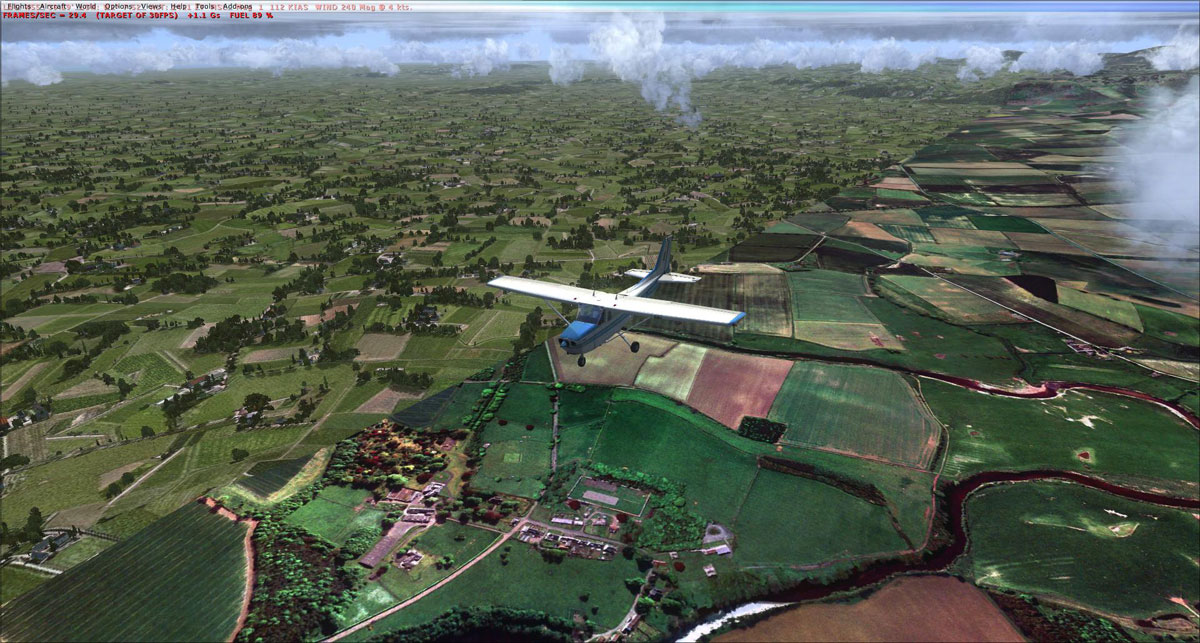
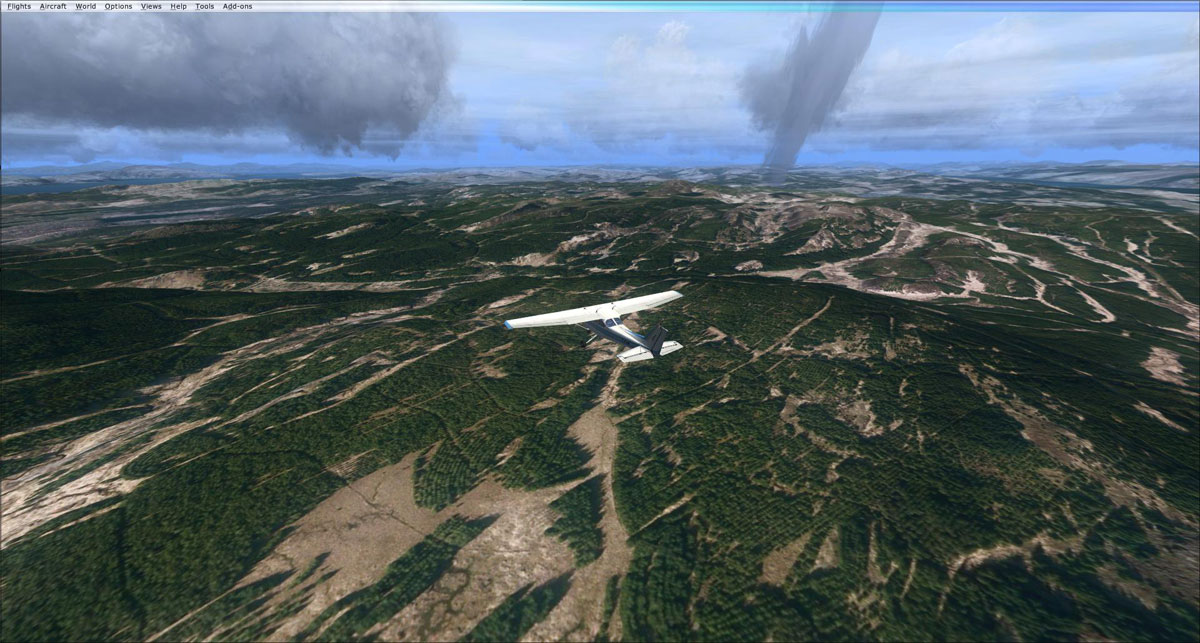
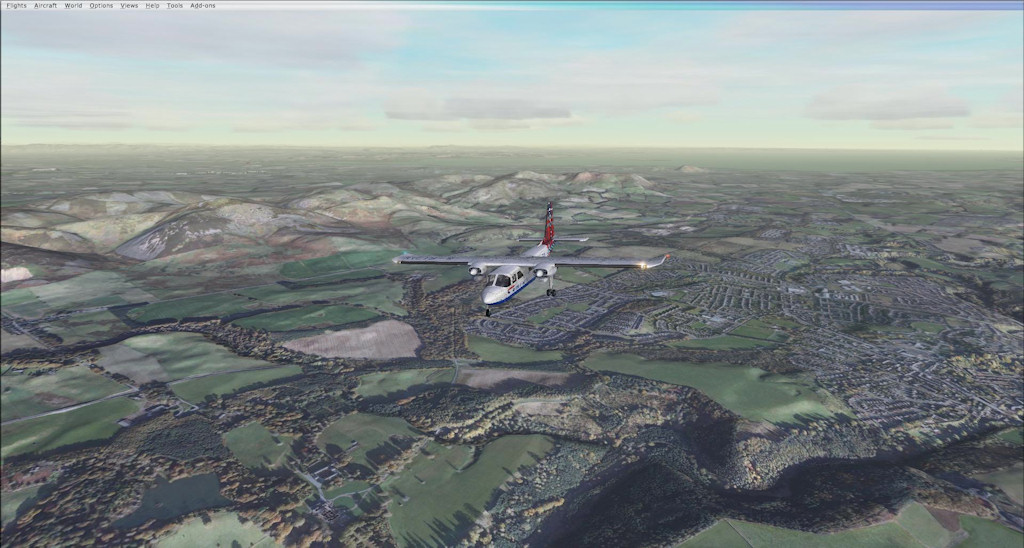
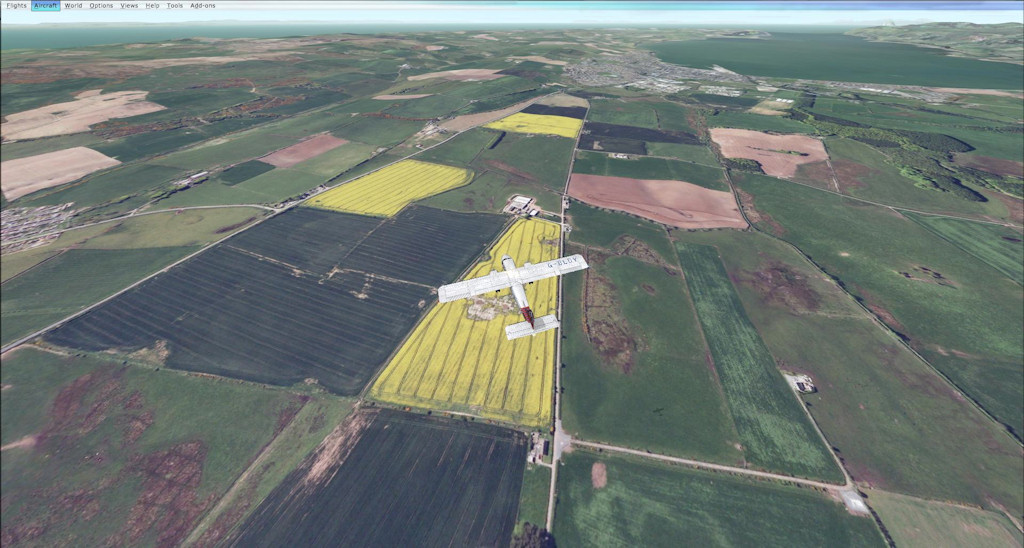
Photo Gallery
Pictures can often speak louder than words, so here are a few
shots taken whilst writing this review.
Click on shot to enlarge and use arrow
keys for next and previous.
 |
 |
 |
 |
 |
 |
 |
 |
 |
 |
 |
 |
Verdict
Having encountered a couple of small problems myself and reading about others, plus the omission of night lighting and seasonal variants, I am giving Vol.8 Southern Scotland a Mutley’s Hangar Score of 9/10.
Apart from the problems encountered (which were easily remedied), my score is down to the excellent level of detail the guys at Playsims and Horizon have managed to squeeze into this volume. Congratulations guys, an excellent job.
Brian Buckley
Review machine Spec: Core i7 -2600 CPU @ 3.40GHz |
8Gb DDR3 Ram |GTX 570SC 1280Mb |Windows 7
64bit
