Having dabbled somewhat with a variety of scenery-orientated utilities in the past, I was keen to have a ‘play’ with the new, revised version of Instant Scenery from Flight1. The applications, with which I had become familiar, used an ‘icon-based’, top-down graphical approach, whereas Instant Scenery promised an interactive, ‘first-person’ 3D perspective.
So would it live up to its claims and how would it compare to the alternatives? Importantly, is it worth the £19.99 ($29.99) asking price when the alternatives are usually available as freeware? Well, I decided to find out.
What exactly is Instant Scenery 2? The opening paragraph of the (35 page) documentation sums it up succinctly: “... Instant Scenery is for adding objects to flight simulator scenery in a very easy way. It allows you to enhance the scenery without leaving flight simulator. Easily add, move and delete objects, and see the results of your actions directly in the flight simulator view without having to reload scenery every time...”
Well, I’m so impressed with this software that in a bid to encourage you to read on, I’m going to ‘cut to the chase’ and declare right now that: it certainly does what it says on the tin, and it does it very well.
It is simple to use (subject to a slight learning curve), can produce extremely professional-looking results, is extremely addictive and should be regarded as an essential tool for any budding scenery-designer. Not only does it represent good value for money but it is both intuitive and very powerful; moreover, the latest version has improved significantly on the original edition.
If you have used an ‘object placer’ before, you will be aware of the basic functionality and approach, but as opposed to placing representative ‘icons’ using a top-down approach, with IS2 you are actually there, on the battle ground with a first-person view of what’s happening. You will be amazed at how much easier, quicker and generally more pleasing the whole experience is.
A picture paints a thousand words, so... Regardez:
 BEFORE – default scenery EGOV with all default objects ‘excluded’ |
 After one hour with IS2 |
 One more hour - zooming out a little – all trees are added (no autogen here!) |
Okay, it did take an hour or so to get to grips with the program, and a few more to locate, download and install various object libraries (I’m using “Ted’s RAF Buildings and Hangars” for FS9 and FSX here), but once you’re up and running, it literally takes a matter of hours to get a decent looking airfield.
 From a different angle – notice the walled-in coach park and wooden fencing |
 In-sim external view |
 And as darkness encroaches – quality objects include night lighting for both FS9 and FSX |
Now, I thought long and hard about how to approach this review: How much technical stuff should be included? Should it be aimed at people with scenery design experience or at novices? Will too much technical jargon put people off or reassure them that it really is quite simple?
I finally decided to take a middle-of-the-road approach, and include just enough technical detail for experienced users to see just how simple this software is to use – especially compared to many others out there - whilst at the same time, reassuring novices that although there is a certain amount of folder structuring and moving files around, they should not be put off by this. So, I have included the bare minimum of technical aspects in the main body of the review, whilst retaining a degree of transparency regarding technical requirements, and included a much more detailed section by way of an ‘Appendix’ at the foot of the article for anyone requiring a little more help.
This appendix is for those that know little about scenery design, as although IS2 can be used with very little technical knowledge, to get the most out of it, it will help to know how everything comes together. The big picture is also important should you wish to combine the use of this software with other applications to create a complete airport that will support the use of Ai traffic.
The second Appendix includes additional images - together with relevant notes - that you may wish to look at.
Overall, the net result, as you will see, should be seen as ‘part review / part tutorial’ - which I feel is appropriate for this type of product.
IS2 -The Main Features-
Okay, I’ll start by summarising the functionality of this
product before moving on to look at a few of them in a little
more detail. After around 30 hours of use I would say that the
following features are those most worthy of note:
1. IS2 employs a “WYSIWYG” approach – ‘what you see is what you get’. Other object placers tend not to offer this level of functionality.
2. The users’ aircraft (in-sim) is slewed into position providing a camera view of proceedings. Depending on which mode you are working in, the mouse can be used independently in an intuitive manner, allowing objects to be placed or modified easily. Full marks to Flight1, for listening to their users!
3. New scenery is viewed immediately, in real-time, without having to reload the sim. The scenery is only reloaded when you open or create a new BGL file to work on.
4.
By ‘auto-scanning’ installed scenery, it
allows you to use the objects it finds – and can utilise -
immediately in your own scenery creations. Not only is the
default scenery accessible, but many of the 3rd party
sceneries that you may have installed. {This
allows for the use of ‘much of’:
OrbX, Aerosoft and Fly Tampa sceneries etc., as well as
the myriad of ‘object libraries’ freely available on the net.}
5.
It supports the creation of thumbnail
images of all useable objects, which is essential once your
library of available objects exceeds 10s of thousands!
6. It is VERY easy to use – subject to an initial period of both experimentation AND reading the manual. This second version of ‘Instant Scenery’, has completely overhauled the user interface, and thereby created a much more user-friendly application for budding scenery designers.
7. It comes with standalone ‘MDL importer’. This allows you to import many raw 3D-models (usually in the form of an “MDL” file). These may have been created by other people, or you can use your own if you use FSDS or GMax 3D type modelling software. These models are essentially converted into the “bgl” scenery files that flightsim recognises so they can be utilised by IS2 in the normal fashion. Once placed into the ‘Scenery Library’ of your sim, this object is then available to IS2, allowing it to be placed into your scenery.
8. With a little imagination, it can be used to directly ‘edit’ existing sceneries (if created by IS) or to indirectly edit other 3rd party or default scenery via the use of ‘exclusion rectangles.’ This allows you to fine-tune certain areas of existing scenery that is either causing problems, or contains objects you simply wish to remove. For example, you may wish to replace certain objects with alternatives, or you may simply want to improve frame rate performance where the “density scaling” is not optimised.
9. It is relatively cheap and offers exceptional value when you consider how powerful and configurable it is. Professional-looking scenery that is both Ai-traffic friendly graphically pleasing can be created and configured in order to optimise performance on your PC.
10. The amount of scenery you can create is unlimited; it can be created ANYWHERE (not just in and around airports) and - subject to some restrictions - can be used to create ‘payware’ scenery.
Using ‘Instant Scenery 2 -
functionality and ease of use
Most of the default objects that are built into the flight
simulator program are theoretically available to be placed
anywhere within the flight simulator world.
Additionally, any object that is included in any addon
scenery you may have installed can (usually –there are some
exceptions) be utilised in this fashion.
Yes, that includes the gorgeous motor car cars found
throughout the OrbX addon sceneries, and you can even recreate
Aerosoft’s Innsbruck airport at Caernarfon airfield – should you
wish to!!
Essentially, Instant Scenery allows you to place any objects you have installed on your hard drive, just about anywhere in your virtual flight sim world. You can recreate authentic looking WWII airforce bases, or a seaplane base on your favourite lake, or add dynamic scenery with gates that will actually open and close. You can add apron lighting (that actually works!) or exclude 3rd party (and default) objects that you either don’t like, hit your frame rates or simply prefer to replace with something more aesthetically pleasing.
IS2 can also scan any area and identify the object libraries and scenery bgl files that are being displayed – see below – and it offers support for FSDiscover (Flight1) allowing “Points of Interest” to be added.
Moreover, “Version 2” sports a newly designed user interface, and with just a handful of settings to modify in the options screen, its apparent simplicity belies its power.
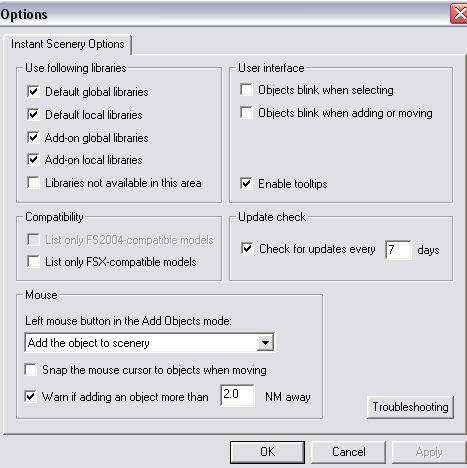
Simple is often better
The most noticeable improvement in this version is, undoubtedly, the manner in which one actually places objects within the environment. In the original version, the aircraft actually served as the cursor, used to identify the position where an object was required. Given that the aircraft can only be moved using the slew command, the whole operation could be very awkward. In this iteration however, as the program can be configured in such a way as to allow the mouse pointer to be used to directly place objects directly into the scenery.
-
[Note: IS2 is opened from the ‘Addon’ toolbar (i.e. it runs as a module inside FS). You can then open a BGL scenery file that you want to work on, from the upper right menu window, or if creating a new file or starting from scratch, go straight into ‘adding objects mode’ whereupon you will be invited to create a new BGL file. Or to continue adding to the last one you had open.]
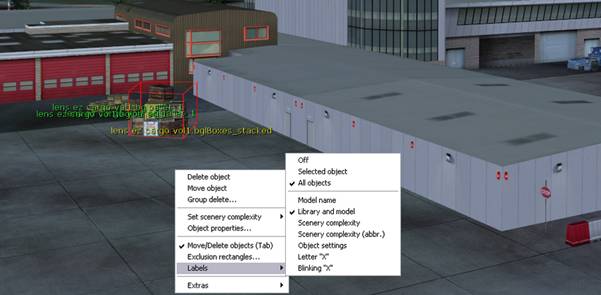
Drag – Drop –Tweak – Viola!
Another extremely useful feature is the ability to identify exactly which scenery objects are being used in a particular area. So for example, if you like a certain object – be it a vehicle, building, or hamburger stand – you can easily locate the particular object library from which it comes. At that point you are then able to load the relevant bgl file, save it into your favourites and thereby gaining quick access to those objects in the future.
Interestingly, IS2 differs from other utilities in two major respects. Firstly, most utilities take a different approach to building airport scenery, by creating just one ‘all-encompassing’ scenery (bgl) file, which contains all the AFCAD (AF2) data, in addition to the airport objects, Navaids and often approach information for Ai traffic. This has its benefits as well as its disadvantages. The real beauty of separating AFCADS from scenery objects soon becomes apparent when you start to use IS2, as you can create as many bgl files as you wish by adopting a “layering” approach. This keeps things more simple and elegant, as well as being more flexible.
Secondly, AFCAD-based airport-design tools that also allow the placement of objects (e.g. ADE or AFX) tend to allow you to only modify the airport and the area immediately around them. But, IS2 can create scenery anywhere... literally. You want a balloon in the middle of the Menai Straits? No problem. You want ‘Airforce One’ parked outside the Taj Mahal? Do it! Moreover, IS2 allows you do it very quickly, effortlessly and efficiently.
[There are, of course, some utilities (such as SBuilder for example) that allow unlimited flexibility, allowing you to create mesh, roads and ground textures, but they are aimed at a very different market, and tend to have an added degree of complexity as well.]

Need a show of force? You’ve got it - no defence budget to worry
about here! (FS9 shown here)
Scenery Layers and the enhancement
of 3rd-party or default scenery
If you look at a typical addon scenery folder, you will find
dozens – sometimes hundreds – of separate ‘bgl’ files. Now, bgl
files are on the face of it, quite a confusing concept. They can
contain anything from entire airports (AFCADS and object
positions) to individual object libraries (3D models in the form
FS can read), to flight plans. Furthermore, a bgl object library
file may range from containing just one object, to many
hundreds.
Now, some developers will create a separate bgl object library for all the cars, or the fences, or the grass at the edge of the aprons. This allows for more flexibility when designing airports, and for the same bgl files to be used in different airports. Moreover, it allows configuration applications that allow you to specify which objects will appear (for performance tuning). This is due to the fact that a positioning bgl file merely points to an object bgl file
These objects include, but are not limited to: airport buildings, static aircraft and other vehicles, flocks of flying birds, people, balloons and dynamic objects. It also allows you to place fences, walls, navaid structures (such as NDB beacons), electricity pylons and vegetation. In other words, with the correct object libraries installed, it is possible to reproduce a realistic-looking airfield to a very high degree.
Yes, it can get complicated –and I’m not even aware of many of the tricks developers use – but suffice it to say, an approach that involves separating objects from flight plans or AFCADS, has a lot going for it. Having discovered IS2, I now use it exclusively for object placement, whilst using a different application for designing the main (AF2) AFCAD.
If you are not familiar with the way in which scenery file and folder structures operate within flight sim, feel free to read the Appendix at the foot of this review. Additionally, there are literally thousands of articles and forums relating to this area on the net. As usual, Google is your friend.
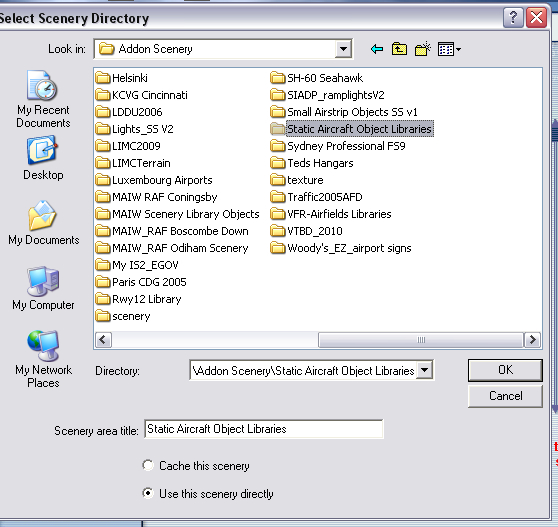 It is convenient to place all addon sceneries folders inside the FS/Addon Scenery main folder |
 Then, ensure all scenery BGL files are placed in Scenery sub-folders – paired with a Texture folder if necessary |
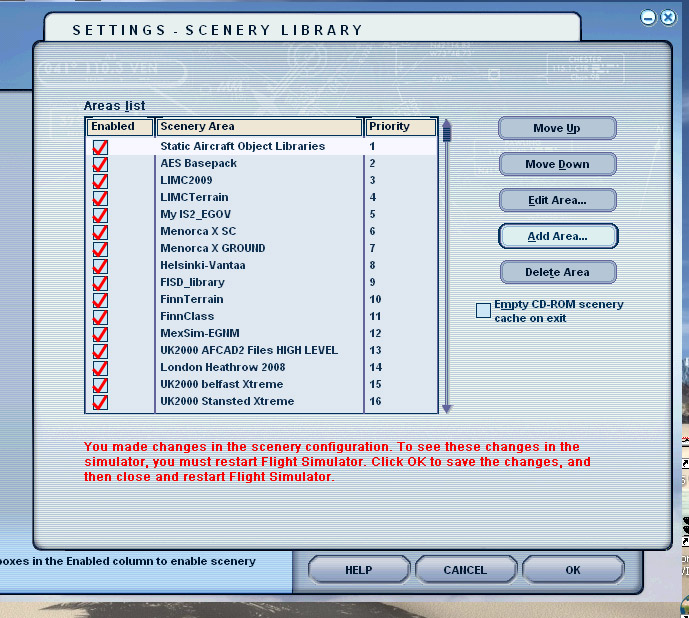 Finally, ensure all object and main scenery folders are ‘activated’ in-sim |
Exclusion Rectangles – thinking
outside the box
As far as IS2 is concerned, it effectively creates a new bgl
file that contains your scenery design. The file ‘points’ to the
objects that you choose to use, and must be activated in the
in-sim ‘scenery library’ for it to work correctly.
As with all scenery, the order of these layers is paramount. So, for example, in the images above, I created a flight at EGOV airport which had been customised by creating parking positions etc., and started the flight, although I could have used the default airport just as easily. Now, although you cannot directly edit this scenery file, you can create any number of additional scenery files that will work in addition to this AFCAD file. Indeed you may create any number of additional scenery files and ‘layer’ them into the sim. It simply works in a cumulative fashion, with those objects showing up, depending on the priorities in the in-sim ‘scenery library’.
So, the bottom layer of scenery would be the basic airport bgl file, whether default or customised with AFCAD data, and then layered on top, would be your IS2-generated object-based scenery file/s.
The beauty of this system is that as long as your IS2-generated scenery files are higher in priority than others, you can exclude certain elements of the lower-placed sceneries. What this means in practice, is that if for example you have a 3rd-party airport but wish to get rid of some elements – flickering fences or pylons, or buildings etc. that you wish to replace, you simply create a bgl file that “excludes” certain areas.
So, by using Exclusion rectangles, you simply ‘blot-out’ those elements you don’t want to see, and save the bgl file. If this ‘exclusion bgl’ is activated and higher in the scenery library, those objects will no longer show up in the sim. This also works with default scenery, to get rid of the ‘horrid’ default objects as well as giving you the choice as to whether autogen objects will show up in those areas.
An important application of this feature is to( effectively) allow you “rescale” the scenery density settings in-sim. For example, I have had problems in the past, where at “Normal” density settings, the scenery hits my frame rate performance too much, but stepping down to “Sparse” removes nearly everything! This is not good as essentially the ‘density scaling’ is not optimised. But, using exclusion rectangles allows you to prevent objects (or indeed entire areas) from showing up in-sim. You are not actually deleting any objects, nor are you modifying 3rd party bgl files; rather, it simply places a transparent box around them, so that only the ground textures show through.
Note that you will have to reboot the sim, for the exclusion rectangles to work their magic and to enable you to see the result (don’t ask me why.) Also, you will find, on occasion, that this will not work – particularly if customised ground textures and complex terrain mapping has been used in the design of the scenery you are attempting to affect. But, it’s worth a try as more often than not, it will work just fine.
You can also place objects over the top of these exclusion rectangles, thereby replacing what was showing up at a particular spot, with something of your choosing. Again, you are limited only by your cunning!
-
Remember, it is important if you are using exclusion rectangles, that you place your BGL files at higher priority levels in the Scenery Library. Also, you do not need to create separate exclusion BGLs - you can simply include the exclusion rectangles as well as the scenery objects you want to add, all in the same BGL file. Once you have saved the new bgl file, you will need to leave the sim, activate the new scenery file and ensure it is of higher priority than then the scenery file from which you are excluding items from. Once you reboot the sim the offending items should no longer be visible, replaced instead, but yours. Magic!
Editing the properties of objects –
changing elevation, heading and density settings
Right-clicking the mouse is your best friend. Highlight and
right-click an object, allows you to access the ‘object
properties’ which permits various features to be modified.
Basically there 2 modes of operation:
Move/Delete or ‘Group
Delete’ and un-checking that mode (or hitting “Tab”) switches
you to the (default) mode for ‘adding objects.’
-
[Note that IS2 always opens with the ‘active’ object library file being the one you were last working with. You should also be aware that although it will automatically add new objects to the last scenery file you were working on, you will need to actually “Open” that bgl file before you can ‘edit’ it.]
Elevation, heading and other features including the density setting at which it appears, can all be changed easily. Moreover, once you change the heading, it keeps that new heading as default while you remain in placement mode. So adding a line of different objects can all be done so with the same heading.
A good tip for adding trees and other vegetation, is to create a bunch of say: “Type A” tree at a certain heading and scale, then repeat this for “Type A” tree but with a different heading and scale. Once you have groups of 6 or 7 different versions of these trees, you can then move them around and mix them up. Rinse and repeat for different types of vegetation etc. and you end up with realistic looking woodland (as per my screen shots above) instead of a line or bunch of trees all with the same heading and size!
Sometimes of course, you will find a decent object library already has different sized version, but don’t be afraid to experiment with your own scaling - and certainly change the headings; it can make a big difference to the final effect. There is also a ‘create a line of objects’ feature in IS2 which can be very useful in this respect as well, although once placed, only the individual objects making up that ‘line’ can be edited. So, ensure that you define the properties of the object line you intend to create, before finally placing it or it can take an age to modify it.
You will eventually develop your own style and preferences when using this software, as there are often a number of ways to achieve any particular outcome. Just remember that these principles apply to all objects, not just trees: most can be changed with respect both scale and orientation... and of course elevation.
Changing elevation is fun. It can also be used to great effect with a little imagination and bit of trial and error, but I’ll let you find out about that for yourselves. [Hint: check out the stack of crates in the second of the “Supplementary Images” below.)

All object properties can be edited at any time
Importing MDL Files and Creating
Object Libraries
The Library Maker is an excellent bonus tool found in IS2.
Although the bglcompile.exe from the SDK pack can be used, again
this provides a simple and quick way to convert MDL files made
from GMax or similar software, into a simple bgl object file.
This is then moved to a scenery folder (either its own or your Object Library folder), the textures that came with the MDL files are moved in to the sibling Texture folder and then the parent folder is activated. Rescan addon scenery again once you open IS2, and you will now able to add those objects.
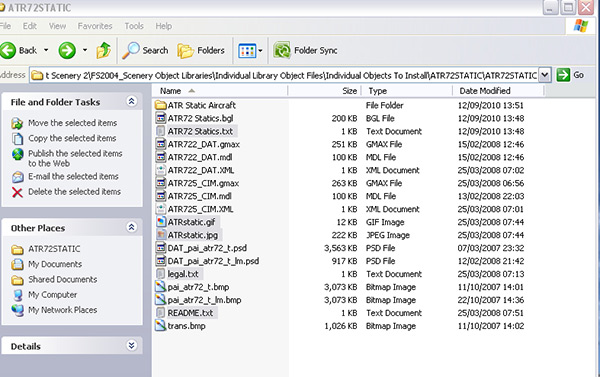 A typical raw MDL/3D file you will find online – note: most are already in bgl format |
 Simply import the relevant MDL files into the IS2 bgl-compiler |
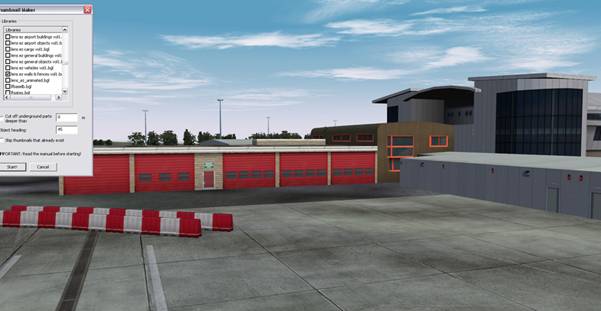
Creating ‘Object Library’ Thumbnails
Worthy of note is the thumbnail making utility. Having
downloaded, imported and activated thousands of library objects,
how do you navigate around them in order to select which you
will use?
Well, initially, you need to identify those bgl files that you
are interested in. Some libraries – such as the Runway12 and
default libraries – have thumbnail sets already created and can
be downloaded and placed in the IS2/Thumbnail folder: Viola!
But if you need to make them, simply use the thumbnail maker.
Now, this part is the most awkward and initially frustrating
part of the entire program, and it does take a little getting
used to. But, if you follow the instructions and setup the sim
‘just so’, it works just fine. It does take a while though –
around 5-10 seconds per object, so only create thumbnails in
small batches, as and when you need them.
I would like to see an external application, capable of creating
thumbnails outside of the actual sim itself; whether or not this
can actually be achieved, I don’t know. Perhaps Version 3 (?)
will at least improve the methodology for creating thumbnails.

Initially, your screen needs to be fully “greened-up” and this
house located – use ‘slew’ and ‘zoom’ to do this
Used-Object
Catalogue – Hitting the ‘?’
The final feature worthy of note, must be hitting the ‘question
mark’ (?) at the top right of the library screen. This brings up
a list of all the objects used in your currently loaded BGL
file, and the names of the object. This is very useful if you
wish to distribute your BGL file as freeware. This will allow
users to know which object libraries they need to install in
order to get the most out of the scenery file. In fact, in very
complex sceneries, this list can extend to hundreds of objects
from dozens of libraries, so is extremely valuable both for
end-users, and indeed, your own sanity! Where did that bulldozer
come from?
Conclusion
Whether you are already a keen scenery designer or are merely
considering giving it a bash, this application is certainly
worth checking out. Even if you use other software, this will
still earn its place in your tool kit. For some aspects of
design, it cannot be bettered, mainly as a result of its WYSIWYG
interface and speed of use. For many, once you’ve got to grips
with its nuances, you will probably use it exclusively, at least
for object placement, or for the indirect editing of 3rd
party or default scenery.
Bottom line: it is cheap, extremely good value considering what it can do, and within a few hours you’ll have it under control. So, at least, download the demo, give it a 30-day trial (using Flight1’s refund policy), and if you don’t decide to keep it, then I’d suggest that you’re simply not really interested in making scenery!
![]()
Verdict: The Good, the Bad and the Ugly
Good:
- Good support – a few hours at the most get’s a response. Errors can be recorded in a log, which can be posted on the forums as aid to tech guys.
- Simple ‘WYSIWYG’ interface with a manageable suite of features and options to configure.
- Well written manual in just the right amount of detail (35 pages.)
- Can be used to supplement other design tools or as an alternative for certain functions.
- Free upgrade for owners of version 1
- A demo is available for 50m radius of KSEA (for 30-days) – and there is the usual 30 day guarantee from Flight1 using the wrapper system.
- At £19.99, it is relatively cheap, offering great value using the: ‘Gabe Logan Bang-For-Buck coefficient.’
Bad:
- Probably the “nature of the beast” as opposed to the fault of Flight1, but thumbnail creation can take an age. As an example, from 300-odd object libraries I have installed, choosing just 12 of them proved to contain around 1000 objects, and it took 2 hours to render the thumbnails. This is faster in FSX if you have a Quad CPU of course, but FS9 is restricted to using just 1 CPU core and therefore, so is IS2 as it is a module. [HINT: backup the thumbnail folder – regularly!]
- Can’t group-select items and change
properties (e.g. heading or Density setting) ‘en
masse’ – i.e. once placed, an object’s properties can
only be edited on an individual basis.
- Once ‘Scenery Scan’ starts, you cannot stop it... or at least I couldn’t find a way. Given it can take a long time if you select a complex region with 10s of thousands of objects or if you have many scenery files installed you may decide you do not wish to wait for it to finish – tough! You may also forget to set a sensible radius for the search. If the ‘thumbnail creator’ can be stopped by hitting “Esc”, why not the scenery scanner?
Ugly:
- The thumbnail maker can be very fiddly
– it takes a while to get the hang of it. It would be much
better it could be used outside of the flight simulator. I’m
not sure if this would possible, but would welcome any
improvement to the current system.
This product is so near to being a 10 but niggles like the thumbnail maker lose it a point, the value for money claws back a half so overall I award this a Mutley's Hangar score of 9.5/10
![]()
[Note: support is
available at
www.simforums.com
![]() ]
]
APPENDIX 1 - Supplementary Images
 An empty corner of the excellent default (MexSim) EGNM |
 30 Minutes Later with IS2 – my own cargo loading yard |
 Design it with (parked) Ai aircraft in mind – these gates are animated (open with NAV radio freq.) |
|
 Create an air force base from scratch – realistic or fantasy – who cares! |
 Close-up of Entrance – level of detail is unlimited |
 Expanding your base – just use your imagination (“... I’m growing tomatoes Your Honour – honest ..!”) |
Appendix 2 – Technical Reprise
“The Basics of Scenery Design and the Role
of IS2”
Please note: I am certainly no expert in
this area, having only been dabbling in scenery design for a
couple of years now, of and on, so compared to many I am a
relative novice. But, arguably, this puts me in a good position
to review an addon such as this: while the software is of use to
advanced scenery designers – indeed, many good scenery designers
use it – it is also aimed at beginners: the clue being in the
name!
What is a bgl file?
What is a BGL file
If you’ve ever wondered why there is no Ai traffic at a
particular airport, this is likely because of the fact that many
default airports will not be configured for parking of aircraft.
Basically, with over 25,000 airports it is nearly physically
impossible (and certainly not financially viable) to customise
each one. You will find that most large or regional airfields
will have at least a few parking spaces available for AI
traffic, but smaller ones will be completely devoid of them.
Even if you have installed flight plans that direct traffic to
the airport, if there are no correctly configured parking
places, once landed, the Ai aircraft will simply disappear into
the ether. This will also happen if all the available spaces are
occupied.
In order to permit Ai aircraft to land, taxi and take off from
any specific airport, one has to add at least one parking space
which is ‘plumbed-in’ to the rest of the airport: i.e. attached
to the runway. Moreover, you may wish to significantly increase
the number of spaces even at international hubs, particularly if
you are using “real-world” addon traffic packages.
Now, in the flight simulator world, you will encounter many
scenery (aka ‘bgl’) files known as AFCADs. This particular
flavour of bgl file contains information relating to NAVAIDS,
communication frequencies, geographical coordinates and
elevation data. This is in addition to parking spaces and the
taxi routes connecting the parking spaces to the runways. [OK,
that is a potted history of AFCADs, which can include much more
complex elements, but hopefully you get the idea].
What Kind of BGL File Does IS2 Create?
Now, this is important: IS2 does not
allow you to create AFCADs. Nor does it allow you to create the
3D objects you see. Instead, it allows you to
POSITION the actual airport objects that you
can see within your simulator. Objects include, but are not
limited to, buildings, static aircraft and vehicles, fences and
walls, pylons, fish and other livestock, static or dynamic.
Other utilities, such as the ADE (Scruffy Duck) or AFX (Flight1)
need to be used to create or customise AFCADs, and for objects
themselves, you will either need to use a modelling creation
tool such as: ‘Instant Object Maker’, ‘FSDS’ or ‘3DMax’ , or
alternatively download 3rd-party objects/object libraries if you
are not content with the default libraries that come with your
flight sim application. Note that FSX includes far more default
objects than FS2004. Also, FS2004 default stuff is pretty low
quality and definitely benefits more from finding the latest,
quality libraries available.
However, what IS2 does allow you do easily, which many
AFCAD-based utilities do not, is it allows you to
add scenery objects ANYWHERE in the flight sim
world. In other words, scenery creation is not just limited to
the immediate airport area.
Installing Object Libraries and
Scenery Activation
So how do you go about beginning to find objects and get them to
show up in your virtual world?
Well, the first step is to decide which objects you want to use.
Now as alluded to above, there are plenty of default objects
already installed in your sim: ‘default object libraries.’ These
are available immediately within IS2. But, if you want a little
more variety or want to use some of the superb object libraries
available as freeware, or indeed some of those packaged with
3rd-party addon sceneries (Aerosoft, Fly Tampa, OrbX etc.), you
will need to make sure that these are installed on your PC.
Once ‘activated’ in the ‘scenery library’, they can then be
scanned by IS2, thumbnails can be created (if not already
available) and they will be ready for immediate use in your
scenery creations. Indeed if you search on the net, you can
often find pre-prepared thumbnail packs (Google “Thumbnail
Pack”) for not only the default objects but also the well known
and popular ‘Runway12’, ‘OrbX’ and UK ‘VFR’ or ‘Farm strip’
libraries.
As well as large object libraries such as those from Runway12
(which should really be your first port of call – particularly
for FS2004) there are thousands more available as freeware from
the usual sites: AVSIM and Flightsim etc. These will need to be
installed in your main flightsim folder and IS2 instructed to
‘scan all addon scenery’.
NOTES:
1. IS2 will only scan those scenery files that it finds
indexed in the’ scenery.cfg’ file. It is therefore important to
ensure any object libraries are installed on your drive and
activated n the flight sim library.
2. I find that adding ‘object libraries’ (both the ‘bgl’ files
and texture files) into a ‘parent folder named “Object
Libraries” is a good idea. You can create additional sub-folders
within this should you need to (for instance duplicate naming
schemes for different objects causing a conflict).
The sub-folders of each main object library folder should then
be named “Scenery” and “Texture” as the protocol is always the
same: bgl files in the scenery folder will point to their
required texture files in their companion Texture folder. See
image below. [Anecdotal note to self: remember that it is:
“Texture” not “Textures”... small difference but it can lead to
big problems]
3. At this point, the parent object library folders (each with
scenery and textures sub-folders) must then be ‘activated’ in
the in-sim ‘Scenery Library’ (under “Settings”.)Note, in Fs2004
you will now need to reboot the sim, while this not necessary
using FSX.
4. Any new objects you download, after ensuring they are in the
bgl format (convert if not**) are simply copied into the
sub-folders. Scenery files are BGL format, whereas textures are
usually BMP.
**To elaborate a little, the ‘object libraries’ come in the form
of bgl files and usually, texture files as well. These are read
as scenery files by flight sim, and as such still need to be
activated in the scenery library. They may at times come in the
form of ‘MDL’ files. Don’t be scared of these, as they are
essentially the raw 3D model, and can be easily
converted using IS2, to a bgl file that can be read by FS.
IS2 Created Scenery Files Are NOT Object Libraries
It is important to realise at this point, that the bgl scenery
file/s that you create using IS2, do not actually contain the
objects themselves. Those are contained in the object library
files you downloaded earlier (or, of course, in the default
libraries.) Indeed, you will encounter many different types of
bgl files. All are essentially scenery files as far as FS is
concerned, but may range from actual objects, to flight plans,
to complete airport sceneries.
Now, the scenery bgl files (as opposed to the object library
bgls) you are creating using IS2, need to be activated as well.
There are two ways of doing this. One way is to put them into
the main ‘Addon Scenery’/’Scenery’ folder, or (better in my
opinion)the alternative is to put them into their own scenery
folder. So, create for example: “Gabes_UFO_BASE_Scenery” folder,
with a ‘Scenery’ sub-folder, and place it inside the ‘Addon
Scenery' folder of your main installation folder. Finally,
‘activate’ the parent folder once inside the sim, using the
‘Scenery Library’ tab in the main FS interface.
Using a separate scenery folder for your creations, keeps
everything tidy. If you create multiple bgl files for one area,
they will all be easily ‘locatable’ and you can see exactly what
you have. Using the default “Addon Scenery” sub-folders for a
general depository, is a recipe for extreme frustration and
premature ageing!
The Scenery ‘Dialogue Flow’ and a Final Note of Caution
Basically, the flight sim reads the bgl files for the area you
in. A bgl file created in IS2, will say: “place building X3
there; vehicle Y there; and tree Z over here... and so on”. The
objects it refers to are (hopefully) found in the object library
bgl that the IS2 bgl points to. Each object has a unique GUID,
and if it finds those object bgl files successfully (need to be
installed and active), it reads them.
In turn the ‘object’ bgl tells the sim its shape and dimensions
and may point to the textures it needs (analogous to its
colouring or clothing if you like!), which are to be found in
the sibling “texture” folder with which it is paired. If
however, those textures cannot be found, the sim continues to
search for them, each time allocating another amount of memory
for it. If this continues for any time, you run out of memory...
OEM !!!
Therefore, to minimise the chances of this happening, be careful
not to use “texture” sub-folders, when there are no textures
being used. If this OEM / texture ‘hypothesis’ is correct, it
may be wise to only ever use a texture sub-folder, if there
actually textures (usually .bmp files) being ‘pointed to’ by the
scenery bgl files. Additionally, if there are bgl files inside
activated scenery folders that are pointing to textures that
don’t exist, this too, may lead to OEM problems.
Additional Resources
Additional information relating to any aspect of flight sim
design can be found on any scenery design forums. There is of
course the official Instant Scenery (Flight1) forum, but in
addition I would recommend the (freeware) design sites which use
the “FS Developer” hub. There is a thriving community there and
you will be warmly welcomed. Not only will you find sub-sites
dedicated to stuff I never knew even existed, I have never had
to wait more than a couple of hours for a reply to a question
Gabe Logan
Review machine Spec: Core 2 Duo o/c at 3.2 GHz
CPU |
2Gb DDR2 Ram | Geforce 8800GTS 320MB (o/c - 970/640) | Windows
XP Pro SP3
 |
System Requirements
|
|
|
|