
Introduction
At first glance, the Buttkicker Gamer 2 may sound like a
humorously named, painful torture device targeted at
users of computer games. For the most part, this statement
is true (omitting the “painful torture” part).
The Buttkicker Gamer 2 is what is technically known as a
“tactile bass transducer”. Simply put, it is a device that
picks up the loud, low, rumbling bass audio from whatever
application you may be running; whether that be slamming a
rocket into an enemy base, applying full reverse thrust upon
touchdown in a Boeing 747-400, or playing the ultimate
power-chord in Guitar Hero. The unique device then outputs
the bass audio signal as enormous vibration directly to your
office chair; shaking you significantly, and, most
importantly, making it seem like you're “really there”.
I have always thought of such products as ones that add a
“fourth dimension” to PC (and, for the record, console)
gaming. Other such luxuries include motion simulation, 3-D
graphical viewing and force-feedback joysticks and yokes. I
refer to them as adding a fourth dimension, because they are
products that aren't really necessary upon first glance, but
drive the customer into a whole new world once they have
experienced it for themselves.
The Buttkicker Gamer 2 is, perhaps, the most well known and
most well marketed product of its type. The product's older
brother and predecessor, the Buttkicker Gamer, is almost
universally acknowledged and acclaimed within the gaming
industry. This has allowed Guitagamer (the company that
manufacturers the Buttkicker series of products) to almost
effortlessly release the Gamer 2; selling upon the
reputation established by the original “Gamer”.
However, apart from a stylistic new name and an excellently
formatted marketing strategy, the Gamer 2 also offers a
plethora of technical benefits. The most prolific new
addition to the product is the inclusion of a brand new,
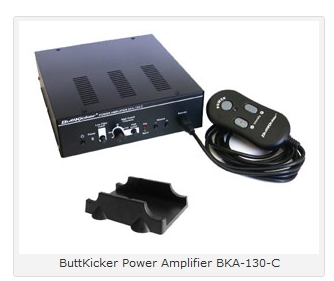
custom engineered BKA-130-C amplifier. This 90 Watt device
is much more efficient, cooler and quieter than the more
bulky, original amplifier provided with Guitagamer's
previous offering.
With all that said, is the Buttkicker Gamer 2 really the
premium choice for dedicated gamers? Does the device
seriously add to the experience of today's incredible PC
software, or should the product indeed have its Butt kicked
off the market?
Please, read on...
Ordering and Purchasing
As previously mentioned, the Buttkicker series of products
are very well known and marketed, so there are numerous
locations worldwide where the Gamer 2 can be purchased.
I purchased my unit from the Shaker Centre, based in Essex,
UK. The Shaker Centre are a British company that specialize
in “Shaker” products, such as bass systems for home cinema
systems, or bass devices for gaming/flight simulation, such
as the Buttkicker featured in this review. The
Shaker
Centre's website.
An alternative UK location to purchase the unit from would
be
www.flightstore.co.uk. Flightstore are a very reputable
UK company; not only selling FS products but retailing an
enormous selection of real-world aviation charts,
accessories, clothing, and much more.
Elsewhere in the world, the Buttkicker can be picked up
almost anywhere. There is a dedicated “dealer locator” on
the Buttkicker official website, however it appears to not
be functioning at this moment in time.
The Buttkicker Gamer 2 costs £149.99 + shipping (this is
inclusive of all taxes). Outside the EU, the unit will be
cheaper as taxes may not have to be paid. Of course, if
importing the product from a non-European location, the
product may be subject to import duty and other taxes upon
arrival in the UK.
Advertised Features (what you get)
A purchase of the Buttkicker Gamer 2 package will provide
you with the following:
- Buttkicker BKA 130-C 90W Digital Power Amplifier
- Buttkicker Gamer 2 Unit (with easy-clamp attachment for desk chairs)
- RCA and mini “Y” adapters
- 230V power supply unit (or 120V if purchased in the USA)
- 5” RCA to RCA cable
- 5” RCA to mini cable
- Two “Velcro” cable-tidy straps
- 13.5' quick-release cable (connects between the Buttkicker and Amplifier)
- Set-up instructions
Upon severing the parcel tape holding my Buttkicker Gamer 2 unit's delivery box, I was presented with the Buttkicker Gamer 2 package itself. I counted myself lucky, as demand for the unit was (and certainly still is) extremely high; and felt privileged to own such a “rare” product.
After opening the Gamer 2's box, I found myself looking at a plethora of cables, wires, papers, the Buttkicker, and its respective amplifier.
Despite being eager, I resisted the urge to simply connect everything together, and instead picked up the well presented, laminated quick-start instructions which deliver a helpful guide to set-up the Gamer 2 unit.
I was pleased to see that every component included in the box came with its own individually wrapped packaging; a minor detail but perhaps a very important one, because it shows GuitaGamer (or, whoever manufactured my particular Buttkicker) cares.
Initial impressions over, I prepared to start the setup process for the Buttkicker Gamer 2. I immediately picked up the previously-mentioned “quick start” instructions, and was drawn to the rather large warning message stuck to the front of the small booklet.
The message informed me that the “banana plug” (a simple two-pronged connector) included in the package would spread (the pins would spread apart) should I try to connect it to its female receptacle. I was told to use “slight force” to attach the plug properly, and was told not to be concerned if the two metal pins start to separate. Of course, at the time, this meant nothing to me as I hadn't even found such a plug to force into such a connector. I did, however, appreciate the early warning.
The quick-start guide first instructed me to assemble the strain relief cable. This is a small 20cm strong rubber band that prevents the Buttkicker's cable from straining, which is more than likely to happen if you are using a “spinning” desk chair. This simple step just involved folding the relief cable over itself and affixing the two ends approximately 8 inches away from each other.
Relief cable, er, relieved, I was commanded to raise the pneumatic lift mechanism (the “single pole” seen on most desk chairs) on my desk chair, to prepare for the actual clamping of the Buttkicker unit itself. The instructions simply state that, once the strut on the pneumatic lift is exposed, to directly mount the Buttkicker to the lift's shaft using the attached mounting bracket. Interestingly, some chairs, like my own, have a plastic sheaf covering this shaft which makes mounting impossible unless you slide it out of the way. Luckily, the quick start guide covers this possibility.
The next step is to connect the two-part quick release cable together. This contraption is made up of two cables, one male and the other female, which connect together and provide the main communication between the Buttkicker and its respective amplifier. The so called “quick release cable” is named so, because it is designed to simply be unplugged and then re-plugged whenever moving the Buttkicker or chair.
Next, one must plug the other end of the quick release cable into the Buttkicker itself. The two-pronged metal banana plug on the quick release cable connects to both the positive and negative (+, and -, respectively) terminals on the “Class 2 Wiring” section of the amplifier box.
The quick release cable's connection to the amplifier is also the focal point of the “banana plug” issue, mentioned five paragraphs ago. The connection between the two cables is done using the aforementioned two-pronged plug, which spreads apart substantially and requires a fair bit of force to slot into place. I am not sure if this was meant to happen, but the fact that a warning message is included in each package raises my suspicions.
The quick start manual advises that the Buttkicker's amplifier be place near to the PC, and in an easy, accessible place for the user. Personally, I have mounted my amplifier at knee-height, just under my desk. This allows me to easily access Buttkicker settings without having a large, chunky obstruction on my desk.


Provided with every purchase is a black plastic stand, which can be used to hold the amplifier if desired. It is my assumption that this is aimed at people who wish to position the amplifier on their desk, as I cannot see it being made useful anywhere else.
To complete this part of the installation process, simply connect the power supply to the back of the amplifier and plug it into a suitable mains source. Of course, this depends where you are located in the world (120V or 230V).
To provide the amplifier with a sound signal, one must obviously connect it to their computer. As there are many different types of sound devices available, the manual provides help for stereo, 4 channel sound cards, 5.1 sound cards and a multichannel sound card with a digital output (and separate surround system).
Since I have an on-board sound-card (5.1), I just plugged the orange jack (Subwoofer) output of my sound-card into the Buttkicker's “Y” adapter. This Y adapter then connects to a dual-ended RCA cable, the other end of which connects to the amplifier itself. Of course, this is just a basic overview and for exacting connection instructions one should refer to the Buttkicker manual themselves.
After connecting the RCA sound cable, the Buttkicker installation is complete. All that's left to do now is to turn the amplifier on, and to start feeling the bass.
Feeling the Bass
With the lengthy installation process complete, I was ready to start using the Buttkicker.
Unfortunately, I was unsure of to how exactly to turn the Buttkicker on. After turning the large amplifier toggle switch on, and activating the power button on the Buttkicker remote, I thought that there was nothing else left to do. Sadly, there was.
Even though both Buttkicker and amplifier were turned on, I could still not get any sort of output from the unit. One thing that could my eye was that the remote, which has a power LED, was illuminated orange, not green. This meant that although there was power going to the Buttkicker, it was not receiving a signal and was, therefore, not working.
In order to diagnose the problem, I ventured into the Realtek HD Audio Manager control panel, which is responsible for dictating my sound-card's operation. I was able to find a test function that allowed me to send a constant bass signal out to the Buttkicker.
Unfortunately, despite the repeated signal, I received no success. It was not until I connected the Buttkicker to my iPod Nano and roared out Green Day's Basket Case on full volume that I achieved a reliable bass vibration. Furthermore, after establishing this reliable signal, the remote's power LED turned from orange to green; a further sign of relief.
Interestingly, the bass tests I did from hereon in the Realtek HD Audio Manager proved successful.
I have now worked out a specific sequence to turn the Buttkicker on. Firstly, I turn the large toggle switch at the rear of the device on. Then, after confirming the orange light has illuminated, ensure that a bass signal is sent to the Buttkicker. Thirdly, I press the power switch, which activates the device, turns the LED to green, and produces the correct bass feel. In my personal opinion, turning on the Buttkicker is not particularly well documented; at least in the papers that were sent with my product.
Now that I had everything installed, I was ready to actually start Flight Simulator X and see just how much fun I could get out of 90 Watts of power.
I loaded a simple flight in the default Beechcraft Baron, starting with the engines turned off, on the ground at Tamworth (YSTW), Australia. After starting the flight, I received no vibration (as expected; the engines are turned off), bar the occasional “hum” of bass produced by other traffic.
After racing through the pre-flight checklists, I slammed the mixture control to “rich”, and the the magnetos switch to the “start” position. To my amazement, the engines roared into life accompanied with a bass throb reminiscent of a 70's Led Zeppelin concert.
I immediately progressed into a short taxi to the runway, and the variations in the strength of the bass feel were noticeable, albeit rather subtle.
Where I did feel a strong difference in vibration was the take-off roll. Real-world GA pilots will testify that more vibration is felt in an aircraft at lower RPM than at higher RPM. Sound strange? Well, it's the truth. This effect is more noticeable in smaller GA aircraft, such as a Cessna 150. At lower RPM, although less noise can be heard and less power felt, there is a much stronger sense of vibration than at a higher RPM value.
In fact, there is even a specific checklist item for my Cessna 150-FRA Aerobat that requires the pilot to “check for undue vibration” when running at lowest possible RPM (around 600- 700 RPM).
The same effect can be felt on public transport. Take a bus, for example. When stationary at traffic lights, with the engine turned on, objects located inside the bus (handrails, etc) can be seen shaking rapidly. However, when throttle is applied and the bus starts to move, this vibration is almost completely eradicated.
The reason why I have raised this particular point is because when taking off in FSX's Beech Baron, I could feel strong, rough vibrations at low RPM, contrasting with smooth, softer and more linear shaking at high RPM.
After confirming that the default aircraft functioned correctly with the Buttkicker, I proceeded to load a test flight with the Level-D Simulations 767-300. Unfortunately, I must write that this particular add-on does not complement the Buttkicker too well, at least according to my own experiences.
Even with full power, and having the sound of the 767's Rolls-Royce engines blast out of my standard speakers, I could not feel a single bit of bass vibration through the tactile transducer. In fact, the only single vent that would ever produce such vibration in the 767- 300 was the operation of the landing gear (which, to be fair, is accurate, as the landing gear often makes abnormally strong vibrations rattle the cabin).
However, the lack of any vibration, especially in a powerful jet aircraft, is worrying. Buttkicker are lucky however, because it is not their fault. The amount of vibration depends purely on the bass in the soundtrack of whatever audio file the aircraft you're flying is using.
Not impressed with the 767's performance, I switched back to a prop. This time, I loaded a flight with one of my old favorites; the Carenado Piper Seneca II. Due to this being similar to the Beechcraft Baron (a twin-engined prop with an almost identical body shape), I expected similar excellence when it came to the Buttkicker's output.
Likewise with the Level-D 767, the Seneca performed equally poor with the Buttkicker. Not even power made a difference to the output; the Buttkicker was simply dead when it came to working with the Seneca. Quite frankly, I was surprised; previously I have mentioned that the Seneca has a fantastic soundset, and still will, but I think its sound package must be geared towards simply being listened to, and not for use with devices such as the Buttkicker.
Perhaps, it would be possible to modify existing sound sets, and apply a “Bassboost” feature (like the one provided with the freeware software, “Audacity”). Perhaps this could unlock the true potential within add-ons that are currently incompatible.
Using the Buttkicker as an Instrumental aid
Of course, because the Buttkicker accepts a universally recognized input, it has the ability to be used with audio devices.
In the “feeling the bass” segment above, you will notice that I plugged my iPod Nano into the Buttkicker amplifier. This, unlike certain FSX add-ons, is always successful in producing a great vibration output. The output from the Buttkicker when used with iPod bass devices is beautifully crisp, punchy and, most importantly, loud.
It is possible to actually “hear” the music through the Buttkicker, with absolutely no other speaker or audio devices. One can hear the lyrics to songs emanating from the Buttkicker, although the bass of the drums/guitar is much more prominent.
Any guitar/bass amplifier which can produce a standard “phono” red/white output can be used with the Buttkicker. Replacing the subwoofer PC cable, connected to the Buttkicker's RCA cable, with an amplifier RCA cable (connected between the “phono” output(s) of the guitar amplifier and the Buttkicker's RCA cables), will allow for such a setup. What a mouthful!
Although Buttkicker do manufacture a “Drum Throne Rig”, I could easy use the Buttkicker Gamer 2 with my drum-set. I can see no problem attaching the unit to my drum stool, and sending a signal from the bass drum to the Buttkicker amplifier via a microphone. I have yet to try this, however.
Using the Buttkicker with Movies
As many televisions provide a suitable RCA audio output, it is possible (and recommended/endorsed by Buttkicker) to connect these outputs to the Buttkicker itself.
Doing so will provide a very satisfying “thud” when watching various films; especially during moments of explosion or similar event. This application is, however, intended only for use with suitable films – do not expect a throbbing bass-line vibration when watching an episode of Teletubbies.
Unfortunately, for whatever reason, I have experienced little success when watching movies on my PC with the Buttkicker. Perhaps it is just me, but I can confirm that nothing happens with the Buttkicker unit either when watching films on YouTube or on DVD via Windows
media player.
First Person Shooters
Although this review is intended to be focused mainly upon the use of the Buttkicker with FSX, I can honestly say that I have had the most fun with this unit when using it with first person shooter (FPS) titles.
Valve Corporation’s Team Fortress 2 provides an outstanding experience when used with the Buttkicker.
Simply put, when used with Team Fortress 2, I guarantee that you will not receive a more exhilarating gaming experience anywhere else. The partnership of both the Buttkicker and TF2 is a match made in heaven.
When playing, one can feel an enormous recoil “thud” from shotgun weapon types, which actually rocks your chair to an extent where you may have to turn the Buttkicker's power settings down. Grenade launchers and rocket launchers provide an equally enthusiastic feel, however it is different to the shotgun's “thud”, meaning that you can actually tell which weapon is being fired just by the feel of the Buttkicker, not the screen.
It is also possible to hear the excellently mastered “background” sounds produced by Valve, which include turbines, sawmills, sounds from other area specific environments, explosions, and many more.
One thing to note; the in-game sound settings must be configured correctly in order to receive such a luxurious experience. Although I didn't have to do much “tweaking” at all, I had to override the manual speaker set-up settings from their default options to the “5.1” settings; which enables the use of sub-woofers/bass shakers.
Of course, I am confident that the Buttkicker will work with a very large variety of games; not just TF2. Remember; the availability of performance depends not on software or drivers, but on a reliable bass output.
Other features/controls
Aside from the intensity and power controls mentioned frequently during this review, the Buttkicker amplifier plays host to a few other controls that may prove useful when “tuning” or configuring your Buttkicker device.
Low Cutoff Filter Controls
The latching push-button switch labelled “Low Filter Cutoff”, as the name suggests, controls whether the C-130 amplifier ignores low frequencies.
This can be very helpful if one is experiencing unwanted bass shaking due to low-frequency interference. To engage the low filter cutoff, simply push the button until it clicks into place.
To be precise, any frequencies below 25Hz will be ignored by the amplifier if this circuit is engaged. Otherwise, such low frequencies will be processed as per normal.
It is not advised to use the low filter cutoff switch if using the Buttkicker for home theater/ motion picture entertainment.
High Cutoff Filter Controls
Whilst the low cutoff filter switch handles the lower end of the frequency spectrum, the high cutoff switch dictates what the upper boundary of this limit is.
Likewise with the low cutoff filter, the high cutoff circuit is engaged using a latching push button. Simply turning this switch on will ensure that the Buttkicker ignores specific high frequencies, the exact values of which are controlled by the high cutoff filter potentiometer
knob.
When the high cutoff switch is engaged, one is able to use the knob (which controls a potentiometer or “variable resistor”) located just to the left of the switch. This knob controls a scale which runs from 40 to 160 Hz.
Should the high cutoff knob be engaged, the Buttkicker will ignore any frequencies ABOVE the setting displayed on the knob. For example, if the knob was set to 76, any frequencies above 76 Hz would not be processed by the Buttkicker.
Note: The high cutoff knob is ONLY engaged when the high cutoff switch is depressed.
Clip and Signal LEDs
These small LEDs, which are constantly flickering when the Buttkicker is in operation, show whether (or not) the Buttkicker is receiving/producing a good, clean signal.
When in use, the Buttkicker's green “signal” LED should be illuminated. Should the red “clip” LED light up, the user should take it as a sign that the in-program audio settings/Buttkicker's settings should be adjusted.
These LEDs are identical in function to that of those found on Hi-Fi sets.
Volume
These two small tactile push switches replicate the function of the Buttkicker remote. They simply control vibration intensity.
Recommended settings for high cutoff/low cutoff controls
Located within the quick start guide is a table which details a list of recommended settings for various application scenarios, such as game-playing, movie-watching, etc.

The Buttkicker Remote
 |
Included with every purchase of the Gamer 2 package is the
“Buttkicker remote”. This neat
little device allows you to semi-remotely control your
Buttkicker unit without having to directly
adjust the controls on the front of the amplifier. The reason for the use of the word “semi-remote” is because the remote is attached to the amplifier using a cable; and thus can only be placed so far away from the amplifier. Through the remote, one can adjust intensity, and one can turn the Buttkicker either on or off (but not completely “off”; this must be done at the back of the amplifier using the toggle switch). Although simple, I find this remote a “must have” when using the Buttkicker. Admittedly, at first, I neglected to use it, but now I find that I can never use the Buttkicker without it. The remote is so incredibly handy for desktop use, as it removes the need to keep bending down and adjusting the amplifier settings. With the remote, it's just “two clicks and you're done”. |
Aside from the previously mentioned “turning on” issue, I have had no other major issues when operating the Buttkicker.
However, one problem that I wish to note (which, interestingly, is also flagged up in the quick start guide), is “chair rattling”.
Due to the Buttkicker's immensely powerful vibration, it is inevitable that loose parts of your desk chair will rattle when in operation. Personally, I think it is slightly unfair to call this a “problem”; it is a superficial issue and is also not a side-effect of poor design.
The quick start manual recommends that “bean bags” be jammed under rattling parts (especially the pneumatic lift handle, which seems to always rattle the most).
Furthermore, although not specifically a problem, the Buttkicker amplifier can become rather hot when used for a long time. Fortunately, there was not one single occasion where my Buttkicker stepped outside of the operating limits.
Documentation
The Buttkicker Gamer 2 is provided with more than enough documentation to assist any user from start to finish.
As well as containing the quick start guide, the package also contains another detailed, in-depth manual, in addition to a safety guide and other notes/information.
The quick start guide is, in my opinion, an outstanding example of excellent documentation. It is bright, clear, and detailed, yet so simple to access and read. This manual really is to be admired, and I think other companies should take a leaf out of GuitaGamer's book when it comes to documentation.
Support
In accordance with the Buttkicker's documentation, one should contact the GuitaGamer company for product support, and NOT the store where the product was purchased.
Of course, this does not mean that should you get a faulty unit it is irreplaceable unless returned directly to GuitaGamer. Under such circumstances, the Buttkicker should be returned to the store from whence it came for a full refund or replacement.
Conclusion
The Buttkicker Gamer 2 package is the perfect option for affordable, reliable and outstanding bass vibration.
Although perfect performance is a mixed blessing when used with specific applications, there is absolutely no doubt that the bass felt in most games is absolutely phenomenal.
For use with flight simulator and first-person shooter titles, I would thoroughly recommend that you consider purchasing the Buttkicker Gamer 2 unit.

Click to visit the Shaker Centre
![]()
Verdict
Pros:
- Excellent punchy, strong and reliable bass feel
- Suitable for use with many applications, from music to games
- Great value for money
- Buttkicker remote – It's great!
- Superb documentation
- Occasionally a little tricky to get the Buttkicker to accept a signal, even if it is a strong one
- Not really a “con”, but beware of successful compatibility with certain FS add-ons
Jack
Whaley-Baldwin
Review machine Spec: Core i7 920 OC @ 3.8 Ghz |
6Gb Tri-Channel DDR3 Ram |GTX285 Graphics |Windows 7
64bit Home Premium
|
|