Introduction
In Flight Simulator, flight planning is a tricky business.
Although there are many, many utilities at one's disposal, none
of them seem to provide exactly what we want. The default FSX
planner provides a great interface that's easy to use; but it
just isn't quite detailed enough and just “doesn't cut the
mustard”. Alternatively, payware products such as Pro Flight
Emulator (PFE) are available, but they come bundled with a hefty
price tag and are often a nightmare to get working.
That's where Plan-G, published by TA Software, comes in.
Developer Tim Arnot has designed an application that allows
virtual pilots to access a wide range of flight-planning
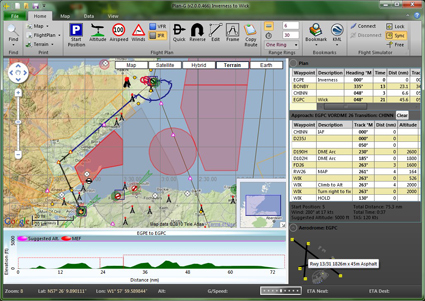
features at their fingertips. The software provides an easy, yet
very powerful interface which allows the user to create a
VFR/IFR flightplan, complete with all the “trimmings”, in
seconds. Plan-G also delivers a printable flightplan sheet, runs
a window which tracks your flight progress in real time, and
provides an easy one-click export to FS9/FSX plan formats.
Oh, and the best bit? It's free.
 |
 |
Getting Started & Included Features
It may be hard to believe that such a seemingly useful application is completely free of charge, and yet the feature list provides further confusion; the quantity of benefits included seems to be more like that of a high-brow payware product than freeware.
Here are just some of the features supplied with each download of Plan-G:
– Full Windows XP/Vista/7 Compatibility
– Works with FS9 and FSX
– Full coverage of the entire earth
– Google Maps integration; see real satellite imagery whilst planning your flights
– Easy flight planning system that allows you to insert/remove way-points instantaneously, whilst viewing the result in real-time on the
provided map display
– Live “moving-map” technology; track your flight's progress in a separate window
– Full terrain profile report
– All VOR/Intersection/DME points labelled
– Professional quality printable flight-plan sheets
– One click data import from FS9/FSX – Import all your custom payware/freeware airports into Plan-G
– Instant flight-plan export – Quickly save your finished flight-plan into FS9/FSX so that you can use it with FS' ATC, GPS and map functions
Plan-G can be downloaded, completely free of charge, from TA Software's (Tim Arnot's) website (http://www.tasoftware.co.uk/
It should be mentioned that the heart of Plan-G lies not only within the software, but also on Tim's website itself, which plays host to a vibrant forum, a small scenery download page, and a detailed blog section written by Tim himself.
Keeping in line with the rest of the software, the “getting started” process is very simple. Double-clicking Plan-G's desktop icon will immediately start the software and will instantly present all its features and offerings to the user at once; no configuration required.
With the software installation process covered (heck, I don't think I have ever written a review with the installation paragraph(s) shorter than 3 sentences – thanks Tim!), it is time to delve into the beloved art of flight-planning, and to see how well Plan-G performs when doing such a task.
Getting Started
Although it is true that all features will be available after each installation of Plan-G, it is essential that you import your airport/waypoints data from FS9/FSX.
Clicking on the “data” tab at the top of Plan-G's interface will reveal a new page dedicated to the importing of FS9/FSX data. Along the top of this page are several click-able icons; two of which are essential for using Plan-G.
Clicking the “barrel” shaped icon for either FS9/FSX will immediately start the process of database building. This process is automatic and requires no other attention than just clicking the import icon itself.
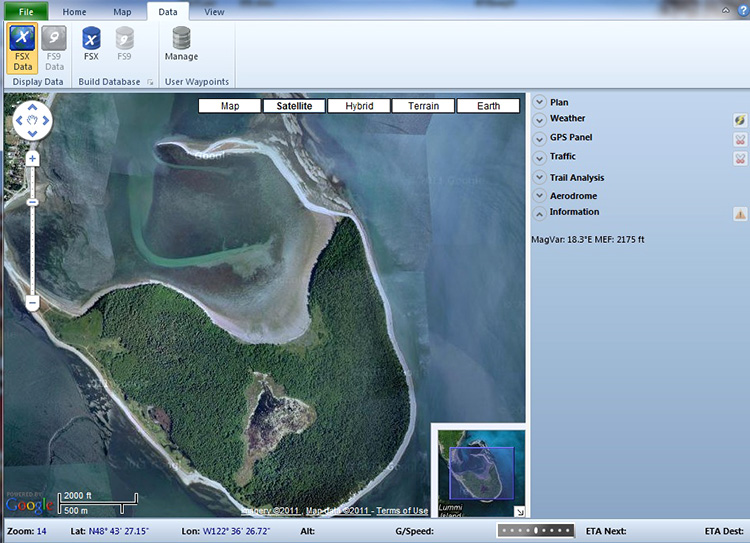
Once the process is complete, Plan-G will have an up-to-date and
complete database of all your FS9/FSX aerodromes, waypoints,
VOR, NDBs, and so on. It is, of course, recommended to update
the database once in awhile, especially if new add-ons have been
installed, so that Plan-G can remain current.
The two options in the top left corner (directly to the left of
the two import icons), which look visually identical to the
import icons except that they're square not barrel shaped,
handle WHICH database Plan-G uses.
This is useful because, if you are running a PC with FS9 and FSX
installed, it is important not to confuse the database between
the two. Creating a FS9 flight plan using a FSX database is
useless!
Once Plan-G has established your FS' database, nothing else is
required to use to use the program.
Creating a Flight-Plan
Although I must confess to not owning a single flight-planning
application apart from Plan-G,
I cannot help but mention that one sentence keeps buzzing around
my head every time I
start Plan-G...
“It doesn't get simpler than this”
Tim Arnot has clearly engineered a piece of software designed
even for the most impatient flight-simmer. Plan-G features a
crisp, clear and powerful interface that allows you to create a
flight-plan in literally seconds.
![]() To create a flight plan, simply click the “quick” bow-and-arrow
icon. A small window will pop up, asking you to enter your
departure and arrival airports (for example, YSTW to YSCH).
After clicking the “OK” button, one's flight plan will be
created instantaneously; it is possible, for some needing only a
basic flight plan, to stop here and simply print/import their
flight plan as it is.
To create a flight plan, simply click the “quick” bow-and-arrow
icon. A small window will pop up, asking you to enter your
departure and arrival airports (for example, YSTW to YSCH).
After clicking the “OK” button, one's flight plan will be
created instantaneously; it is possible, for some needing only a
basic flight plan, to stop here and simply print/import their
flight plan as it is.
However, for most of us, we wish to expand upon the simple
“straight line” plotted between two points on a map. Most pilots
will want to add waypoints, avoid treacherous weather or hilly
terrain, work out an alternate airport in case of an
emergency... The list goes on.
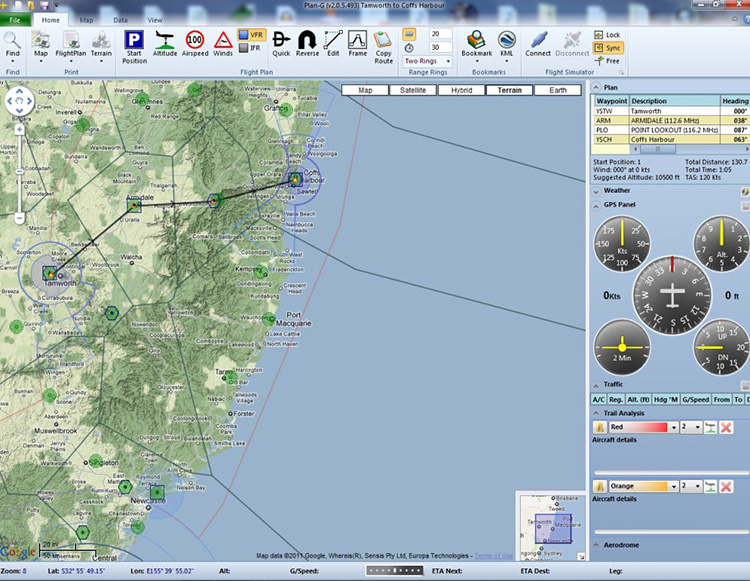
To add a waypoint, click on the drop-down menu labelled “plan”.
This will then reveal the flight plan in its entirety, which, at
this point, will obviously be rather small as no waypoints have
yet been added (Simply consisting of just a departure and
arrival aerodrome). Right-clicking on the appropriate point in
the flight plan will present a plethora of options, two of which
being “add waypoint above” and “add waypoint below”.
Clicking on either option (ie choosing to add a waypoint before
or after the selected point) will bring up a small interface.
This interface is a bank; literally containing tens-of-thousands
of aerodrome, way-point, NDB, ISEC and VOR entries, all of which
can be used at the user's discretion in their flight plan.
It should be noted that the database content IS directly
affected by the original import of data from FS9/FSX that was
conducted in the previous section. This is excellent, because it
means that should you have small, specific add-on airports which
aren't usually included with default FSX, they will still be
recognized by Plan-G; complete with their respective parking
positions/gates.
To the left of the aforementioned “quick” button, there is a
square option panel with a few interesting features. Using the
“VFR” and “IFR” click-able icons, one can instantly alternate
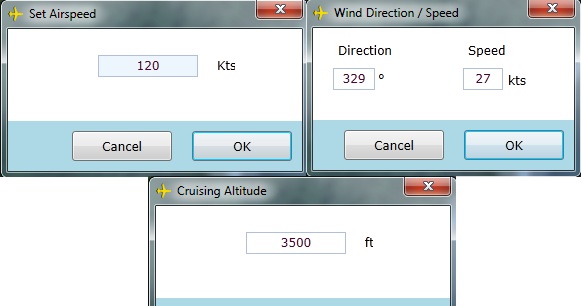
between a VFR or IFR flight-plan. The “winds” button is rather
simple; clicking on it will bring up a small interface, which
allows you to enter in the expected wind values for the time and
date of the flight. Equally as simple are the “altitude” and
“speed” buttons. Clicking on these will bring up a similar
interface, which caters for the entry of the aircraft's expected
velocity and altitude during the planned flight.
One fantastic feature that really completes Plan-G's excellent
inventory is the ability to “drag and bend” the route line.
Doing so will create a new waypoint to the place where the line
is dragged to. Unless the route is dragged to a specific
navigation point (be it a VOR, aerodrome, ISEC, NDB, or
similar), it will not have a name (only called “waypoint X”),
and so can be re-named by highlighting the text associated with
the waypoint and overwriting it with whatever you wish.
Exporting and finishing your
flight-planning
Once one has finished perfecting one's flight plan, Plan-G
allows the user to export their plan directly to FS9/FSX. This
means that, if loaded, one's flight plan will be available for
use in the GPS and MSFS map functions.
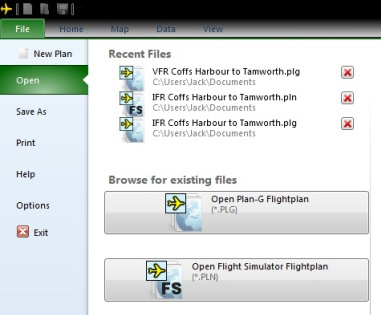 |
To do this, simply click “save as”. The “save as” menu offers
two options; firstly, one can choose to save their flight plan
in a Plan-G format (so that it stays on their hard-drive and is
available for editing in the future), and, secondly, one can
choose an export format (FS9/FSX) which will convert the desired
flight-plan into a MSFS format (which should be saved to the
“documents” folder on a PC). The preferred format is Plan-G format (.plg) these files contain all the extra functionality used in the planner such as alternate destination, waypoint cross-references, descriptive notes, step altitudes, approach etc, that can't be saved in a conventional FS .pln file. After the desired FS .pln file has been exported and saved to the “documents” folder, it can be used with FS9/FSX. Similar to a flight-plan created using the default MSFS interface, it can be “loaded” (whereby your aircraft will originate at the listed departure aerodrome), and used with Flight Simulator's GPS modules (whereby a magenta line will outline your chosen route for the flight). |
Pressing the “escape” key will also provide access to Flight Simulator's “flight analysis” window, from where you can view your route; also outlined in magenta.
Plan-G's easy exportation utility means that it is perfect for add-on aircraft such as Simcheck's A300; where the on-board navigation system (in this case an INS, or Inertial Navigation System) has been tweaked to accept FS9/FSX.pln files.
Printing a flight-plan
Although this particular stage doesn't sound exceptionally exciting, Plan-G's printing feature offers more than it may at first appear to do so.
Printing a flight-plan will deliver a professional paper copy of your plan. This plan is complete with speed, altitude, wind value, waypoint and “remark” entries, so it is more than suitable to use as an instant and handy desk-copy of a flight-plan, which of course can be written on during the flight should specific notes need to be made.
Live Google Maps integration
Google (www.google.com
Plan-G uses Google Maps for its primary mapping system, which takes up approximately 75% of Plan-G's interface window. Whatever route the user has mapped out using the flightplanning tools will appear as a black line across the Google imagery.
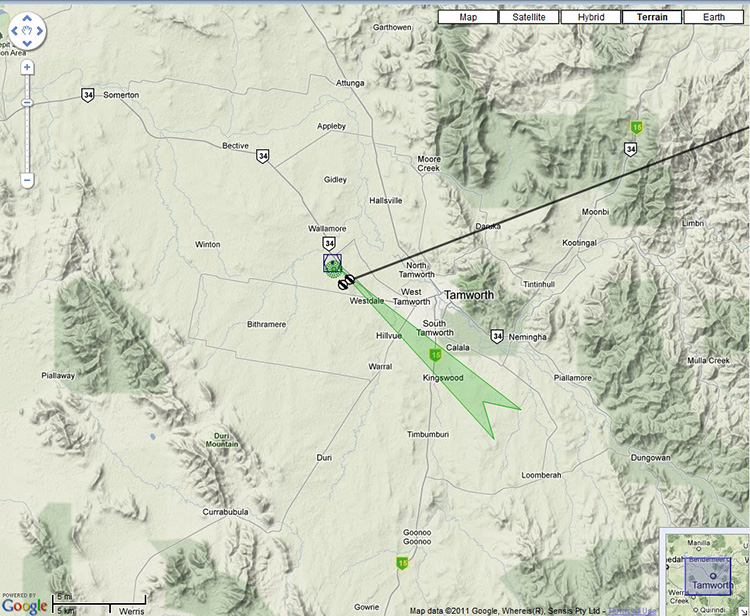
This is excellent, because not only does it provide accurate
terrain data, but also because it allows the user to access the
hybrid, earth, map, and satellite options adorning the top of
the window. These options will switch the type of imagery used
for the flight-plan's map, so that rather than just looking at
one's route above a terrain map, users can also see what their
route looks like over a photographic or hybrid interface.

Google's zoom and shift controls have also been implemented, so
that you can scale the map to your taste. In fact, the only
feature that is not included is the “streetview” function;
although this is rather useless for the purposes of
flight-planning anyway.
Live Flight Simulator
connection
Plan-G has the ability to “connect” to a running instance of
Flight Simulator (be it FS9 or FSX). Doing so will unlock a
feast of new features such as flight tracking, digital
instrumentation displays, and live weather reports.
To connect Plan-G to FS, simply click the “connect” icon in the
top-right corner of Plan-G's interface (NOTE: FS9/FSX must be
running BEFORE you do this). This will instantaneously connect
Plan-G to FS, and will start to provide the user with data (such
as airspeed, magnetic heading, weather data, etc) through
Plan-G's window.
 Clicking on “GPS Panel” in the Plan-G window will bring up a pack of five instruments (DI, ASI, Altimeter, VSI, TC). These virtual instruments connect to FS9/FSX via SimConnect, and have their respective values updated five times per second. This means that the gauges are smooth in their operation, although it should be noted that there is a small amount of “lag” visible (mostly in the VSI gauge). These gauges work very well with FS9/FSX, and are perfect should you want to leave your flight running in the background whilst you do another task in another window, as they can provide “remote” details about the aircraft's flight status. |
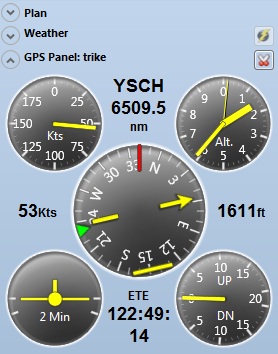 |
The previously mentioned Google map integration also has further benefit when connected to FS9/FSX; Plan-G will “locate and lock” your aircraft's position (ie: keeping it in the centre of the Google map window and tracking its progress by leaving a pink trail behind where the aircraft has flown). The three icons “Lock”, “Sync” and “Free” in the top-right corner allow the user to customize how they want the flight tracking feature to function; “Lock” will firmly affix the map to the aircraft's position, “Sync” does the same, however the user is permitted to pan around an extended square surrounding the aircraft, whilst “Free” allows for full, unlimited panning control.
Support
Tim Arnot has established a support forum on his website (http://www.tasoftware.co.uk/forum/
Similar to most support forums, Tim requires that you register before you can post support questions.
Conclusion
Plan-G is the ultimate solution for both VFR and IFR flight planning needs. Whether you're a basic user or a dedicated “full-depth” user, Plan-G will provide the tools and services you need; completely free of charge.
Its flexibility and easy-to-operate interface means that one can create a flight plan in a hurry; which is perfect if you don't have hours to waste on dragging and clicking route points.
The FS9/FSX connection features put the cherry on the top of this very beautiful cake. There is simply no other planning application which provides everything you need and more!
The best thing to do is to simply head over to TA Software's website and get your free copy of this incredible utility – Flight planning will never be the same again!
Jack
Whaley-Baldwin![]()
Verdict
Pros:
– Freeware!
– Very easy to use
– A multitude of powerful features and tools
– Live Google Maps integration
– Connection to FS9/FSX; moving map and instrument featureswork superbly
– Direct one-click export to FS9/FSX.pln flight plan format
– Printable flight plans are excellent and perfect for desk
use

Cons:
– There are no cons!
Mutley's Hangar score of 10/10 and the Mutley's
Hangar Award for Excellence!
![]()
Review machine Spec: Core i7 920 OC @ 3.8 Ghz |
6Gb Tri-Channel DDR3 Ram |GTX285 Graphics |Windows 7
64bit Home Premium
